Leather hardware is the small metal kit — rivets, snaps, buckles, screws, eyelets, and D-rings — that turns a stitched leather piece into a usable object. The right…
Leather hardware is the small metal kit — rivets, snaps, buckles, screws, eyelets, and D-rings — that turns a stitched leather piece into a usable object. The right hardware locks a wallet closed, anchors a buckle to a belt, and secures a key clip to a fob. Beginners typically over-spend on hardware variety and under-spend on quality; the right approach is to buy two finishes (brass and stainless), three sizes, and replace as needed for several years.
This guide covers every hardware decision a leatherworker faces between cutting and finishing: which rivets actually hold under stress, when to use line-20 vs line-24 snaps, how to set hardware without buying $90 presses, why brass develops the patina that stainless never does, and how to match hardware finish to dye color so the piece reads as designed rather than assembled. Every linked deep-dive expands on a specific hardware decision covered here.
I lost a snap from my first wallet within three weeks because I set it with a hammer and a flat punch instead of a proper snap setter. The cap looked fine from the top but the stud was slightly angled underneath, creating a stress point that failed under daily pocket use. A $10 hand setter kit produces press-quality results in 90 seconds per snap. The hardware selection tables below cover what I now use on every project — copper burr rivets for saddlery, brass double-cap for wallets, stainless for anything that sees weather.
The Five Hardware Categories Every Leatherworker Uses
Hardware breaks into five functional categories: fasteners (rivets, screws, Chicago screws), closures (snaps, magnets, hook-and-eye), connectors (buckles, D-rings, swivels), reinforcements (eyelets, grommets, washers), and decoration (conchos, studs, decorative rivets). Each category has 3-5 sub-types worth knowing; the rest is variation on those themes.
Most beginner projects need only fasteners and closures. A bifold wallet uses 4-6 rivets at stress points and one snap closure; a card holder typically uses zero hardware (just stitching); a belt uses one buckle plus 4-6 rivets to secure the buckle. Holsters and bags add eyelets and D-rings; structured bags add magnetic closures and clasp hardware. Build inventory as projects demand it rather than buying complete kits.
| Category | Common Items | Typical Beginner Project Use | Cost Per Item |
|---|---|---|---|
| Fasteners | Rivets, Chicago screws, T-nuts | Wallets, belts, key fobs (4-8 per project) | $0.10-0.50 |
| Closures | Snaps, magnetic snaps, turnlocks | Wallets, bags, cuffs (1-2 per project) | $0.30-3.00 |
| Connectors | Buckles, D-rings, swivels, trigger snaps | Belts, bags, dog leads (1-3 per project) | $2.00-15.00 |
| Reinforcements | Eyelets, grommets, washers, lace tips | Bags, sheaths, lacing projects (4-12 per project) | $0.05-0.20 |
| Decoration | Conchos, decorative rivets, studs | Belts, accessories, Western styling | $0.50-8.00 |
For a refresher on where hardware fits into the broader skill stack, the leather working for beginners hub covers the six core skills (cut, edge, stitch, dye, hardware, pattern) in sequence. Hardware is typically set after stitching and before final edge finishing on the joined edges — the exact sequence depends on whether the hardware passes through stitched layers (rivets through wallet folds) or attaches to a single layer (D-rings through a flap).
Rivets: The Workhorse Fastener
Rivets are the most common leather fastener — they pierce the leather, expand inside, and lock two layers together permanently. The standard leatherworking rivet is the double-cap rivet: two pieces (post and cap) that join through pre-punched holes and set with a hammer-and-anvil concave die. Single-cap rivets are an alternative for one-sided visibility, but double-caps are stronger and more common.
For the full setting workflow — anvil choice, strike technique, and the mistakes that crush a cap — see setting rivets and snaps in leather; for decorative, reusable options, Chicago screws and conchos cover the screw-together hardware I reach for on belts and straps.
The best rivets for leather guide compares copper, brass, stainless, and nickel-plated options across diameter, length, and durability. Solid copper rivets (the saddler’s standard) are strongest and develop the most beautiful patina; solid brass rivets are the next best and cheaper; nickel and chrome-plated rivets look great until the plating wears off in 1-3 years; aluminum rivets should be avoided entirely (they corrode and crack under stress).
Rivet length matters — too short and the cap will not seat against the leather; too long and the post folds over inside the joint instead of expanding. For 4-5 oz wallet leather, use 6-7 mm rivets; for 6-8 oz belt leather, use 9-10 mm rivets. Buy a length-and-diameter rivet assortment in solid brass for $20-30 and you have most beginner projects covered.
As an Amazon Associate I earn from qualifying purchases.
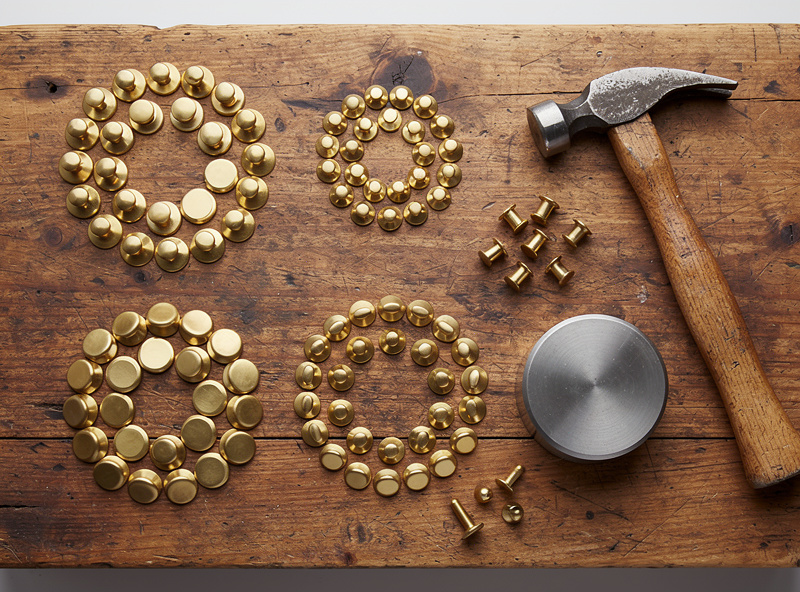
Setting rivets is straightforward but unforgiving of mistakes. Punch the hole the same diameter as the rivet post (no smaller, no larger), insert the post from the visible side, place the cap over it, set on the concave die, and strike with a single firm hammer blow. The cap should compress to a smooth dome with no visible deformation — if you can see a hammer dent, you missed the die center. Practice on scrap before committing to a finished piece.
Chicago screws are an alternative to rivets. They thread together (post and cap with internal threads) instead of expanding, which means they can be removed and reset without damage. Use Chicago screws on items that may need future adjustment (belt buckle changes, customizable straps); use rivets on permanent assemblies where strength matters most.
Snaps: Closure Hardware for Wallets and Cuffs
Snaps are the most common closure on bifold wallets, watch straps, key fobs, and small bags. They work in two pairs (cap+stud on one side, eyelet+stud on the other) that mechanically engage when pressed together. A snap that engages too easily falls open in pockets; a snap that engages too tightly damages the leather around it over time. Sizing and setting both matter.
Magnetic snaps are their own discipline — concealed prongs, washer backing, reinforcement — and I cover the clean installation method in installing magnetic snaps in leather.
Standard sizes are line-16 (smallest, used on watch straps and thin cuffs), line-20 (most common, used on wallets and small bags), line-24 (heavy duty, used on belts and structured bags). The line number roughly corresponds to the snap diameter in 1/40 inch increments. For a bifold wallet, line-20 is the right call; for a Western belt with conchos, line-24 makes sense; for a watch strap, line-16.
The how to set snaps without a press tutorial walks through hand-tool snap setting using a $10 punch-and-anvil set (a step up to the roughly $25 deluxe set adds rivet dies to the same kit). The professional alternative is a $90+ press that ensures perfect alignment every time. For beginners doing under 30 projects per year, hand setting is cheaper and produces equivalent results once you have the technique. The press becomes worth it at production volume.
Magnetic snaps (round magnets in a metal housing) are the alternative to traditional snaps for bag closures. They engage smoothly with no clicking sound, look modern, and pull stronger than expected (15-25 N depending on size). Setting magnetic snaps is faster than mechanical snaps — no hammer required — but they cannot be repaired if a magnet fails. For items that need to last decades, mechanical snaps are still the standard.
The standard sequence for snap setting: punch the hole at the marked location (use a 6 mm or 7 mm punch matching the snap shaft), insert the cap from the visible side, place the stud on the back, position on the concave anvil, strike with the matching punch tool. The leather grain face takes the cap; the flesh side takes the stud. Reverse this and the snap looks backward.
Buckles: The Belt Connector
Buckles are the connector that turns a leather strap into a wearable belt. The category includes single-prong (most common), double-prong (Western styling), roller (anti-friction), and Quick-Release (security applications). Buckle width must match strap width — a 1.5 inch buckle on a 1.5 inch strap, no exception. Mismatched widths look amateurish at first glance.
If you are choosing between roller, center-bar, and heel-bar styles, leather buckle types compared breaks down where each one earns its place.
Solid brass buckles last 30+ years and develop the patina the hobby is famous for. Solid steel and stainless buckles last equally long but stay shiny. Plated brass (chrome over brass, nickel over brass) looks great new and worn ages 3-7 years before the plating wears through. Pure aluminum and pot-metal buckles fail at 12-18 months under daily use; they should be avoided entirely.
Buckle attachment uses 4-6 rivets through a folded strap end. The strap doubles back through the buckle frame, the prong passes through a slot cut for it, and the rivets lock the doubled section against the main strap. This produces a removable buckle that can be swapped without re-cutting the strap. For decorative belts with permanent buckles, use leather lacing or saddle-stitched billets instead.
Sizing the prong slot is critical. Cut a slot the same width as the prong base, ending at a small round hole at each end (to prevent tearing). The slot should be centered on the strap width and positioned 50-60 mm from the strap end fold. Get this measurement wrong and the buckle either binds or falls forward when the wearer moves.
D-Rings, O-Rings, Swivels, and Trigger Snaps
The connector category beyond buckles handles attachment points for straps, dog leads, key fobs, and bags. D-rings (D-shaped rings welded shut) are the most common attachment ring; O-rings (round) are used where two angles of pull need to balance; swivels (rotating attachment) prevent twist on dog leads and key chains; trigger snaps (spring-loaded clip) attach removable straps.
Picking the right size, metal, and weld for these load-bearing rings matters more than it looks — D-ring and O-ring selection walks through it.
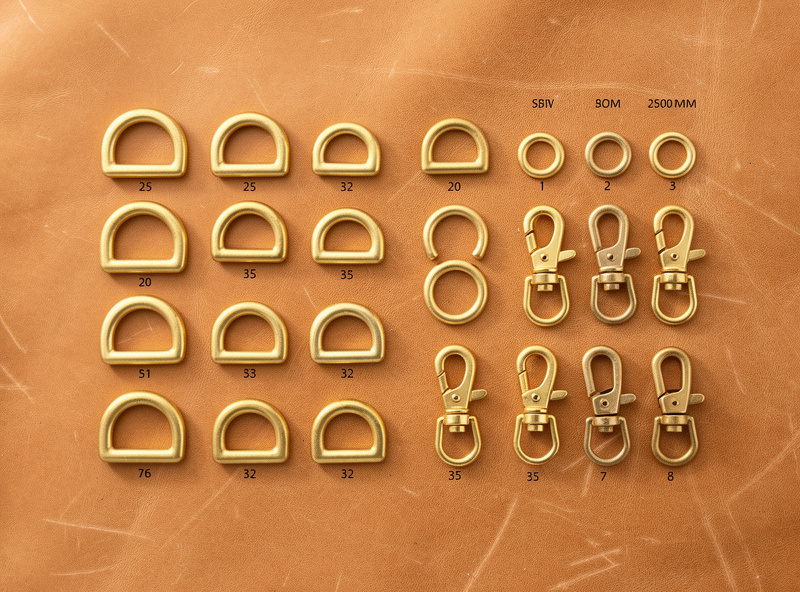
D-ring and O-ring attachment is similar to buckle attachment: the strap doubles back through the ring and is riveted or stitched to the main strap. For load-bearing applications (dog leads, bag handles), use 4 rivets minimum and reinforce with a leather strip stitched across the doubled section. For decorative rings (key fobs, lanyards), 2 rivets are sufficient.
Swivel hardware comes in two main types: barrel swivels (rotating cylindrical body, used on dog leads and fishing lures) and trigger swivels (rotating body with spring trigger, used on key fobs and bag straps). Buy solid brass swivels rated for at least 50 lb working load even on light projects — cheap pot-metal swivels seize after a few months of use and frustrate the user.
Trigger snaps (also called spring snaps or hook clips) are spring-loaded clips that attach to D-rings on the receiving end. They allow detachable straps on bags and key fobs. Sizing matters: the trigger must be longer than the D-ring diameter or it cannot engage. A 25 mm D-ring needs a 30 mm trigger; a 40 mm D-ring needs a 50 mm trigger.
Eyelets, Grommets, and Reinforcements
Eyelets and grommets reinforce holes in leather so they do not tear over time. An eyelet is a single-piece tubular reinforcement (cap with rolled flange); a grommet is a two-piece reinforcement (cap with washer underneath). Use eyelets on light-duty applications (lacing holes on shoes, decorative perforations); use grommets on heavy-duty applications (tarps, belts, bag closures).
Standard eyelet sizes for leather work are 4 mm, 6 mm, and 8 mm inner diameter. The 4 mm size suits lace holes on shoes and small bags; 6 mm suits standard belt buckle holes (though most belts skip eyelets and just punch clean holes); 8 mm suits heavy-duty corner reinforcements on tool rolls and tarps. Buy solid brass eyelets — plated eyelets corrode at the cut edge.
Setting eyelets requires a punch tool matching the eyelet size. The hole through the leather must be the same diameter as the eyelet shaft (no smaller, no larger). Insert the eyelet from the visible side, place on the matching concave anvil, strike once with the matching die. The flange should roll cleanly inward; if it folds or tears, the leather hole was wrong size.
Some leatherworkers explore alternative reinforcement methods. 3D-printed leather tooling includes printable eyelet-setting jigs and customized grommet shapes; CNC-cut leather patterns and dies can produce reinforcement plates and corner reinforcements at production scale. Both are advanced techniques worth pursuing only after standard hardware is reliable.
Hardware Finish: Brass, Antique Brass, Nickel, Black
Hardware finish must read as intentional with the leather color and project style. The standard rule: warm leather colors (saddle tan, walnut brown, English bridle) pair with brass or antique brass; cool leather colors (charcoal, black, navy chrome-tan) pair with nickel or black hardware. Mix-and-match works when you choose a single accent finish (e.g., black hardware on a saddle tan belt as a contrast), but consistent matching is the safer call for beginners.
Finish is only skin deep, though; what the hardware is actually made of decides how long it lasts, which is why I compare solid brass vs zinc alloy hardware before buying.
Solid brass develops a patina from skin oils and oxidation that deepens the gold tone over 1-3 years. Antique brass (lacquered to look pre-aged) provides the patina look immediately but does not develop further. Polished nickel stays bright with care; matte nickel hides scratches better and pairs cleanly with chrome-tan leathers. Black oxide steel suits Western and gothic-style work but rusts on exposed cut edges if not sealed.

For dye context, the best leather dye for veg-tan review covers the body colors that set the hardware-finish decision; the full grain vs top grain leather guide covers leather grades that affect how hardware seats. Coarser-grain leather (full-grain undyed russet) shows hardware shapes more prominently than smoother-grain leather (top-grain dyed black).
Setting Tools: Hand vs Press, What to Buy First
Hardware setting requires three categories of tool: punches (for the holes), anvils (concave forms for the rivet/snap caps), and strikers (the matching dies that compress the cap). The cheapest path is a hand-tool kit — a basic single-size snap setter runs about $10, and a deluxe multi-fastener set covering line-20/24 snaps plus rivets runs about $25 (eyelets need their own separate setter, typically another $10-20, since no single kit covers all three); the production path is a hand press ($90-300) that ensures perfect alignment and applies consistent pressure with leverage instead of hammer skill.
Once the hardware is set, the join still has to hold under load — hand-stitching with hardware attachment covers reinforcing those stress points so nothing tears out.
For under 30 projects per year, hand tools make sense. Buy a Tandy or Weaver hand-tool kit; learn to strike consistently; the projects you produce will be indistinguishable from press-set work. For 30+ projects per year, the press becomes worth the investment — it is faster, more consistent, and reduces wrist fatigue. Above 100 projects per year, dedicated machines (foot-press snap setters, riveters) become justified.
The single biggest hand-tool mistake is using mismatched dies — striking a line-20 snap with a line-24 die produces a cap that is partially compressed and weakly held. Buy snap dies, rivet dies, and eyelet dies in matched pairs at the size you need; do not improvise. Alignment and matched-size are 80% of consistent hardware setting.
The leatherworking starter kit guide covers the foundation tools for cutting, stitching, and finishing; hardware setting tools are typically added in a second purchase round once you know which projects you actually build.
Troubleshooting Hardware Failures
Hardware failures fall into 7 common patterns. Diagnose first, then fix.
Failure 1: Rivet cap visibly dented or off-center. Cause: missed the die center, or used wrong-size die. Fix: drill out the rivet, re-punch hole, set new rivet with correct die.
Failure 2: Snap engages too tightly or too loosely. Cause: snap and stud not seated fully. Fix: re-strike with matching die; if still wrong, replace snap entirely (mismatched sizes).
Failure 3: Buckle prong does not align with strap holes. Cause: prong slot cut at wrong distance from strap end. Fix: cut a new slot at the correct distance, mark with template before cutting.
Failure 4: D-ring rotates loose after weeks of use. Cause: insufficient rivets or thin reinforcement strip. Fix: add 2 more rivets, reinforce with a 1 inch leather strip stitched across the doubled section.
Failure 5: Eyelet rolls back out under stress. Cause: hole too large for eyelet shaft. Fix: replace with grommet (two-piece) or use a larger eyelet that matches the existing hole.
Failure 6: Brass hardware turning green or losing shine. Cause: normal patina (acceptable) or galvanic corrosion from contact with steel. Fix: separate brass and steel hardware; clean with mild brass polish if cosmetic recovery needed.
Failure 7: Magnetic snap pulling apart at low force. Cause: magnets weakened by adjacent steel rivets, or low-quality original magnets. Fix: relocate magnetic snap away from steel hardware (minimum 25 mm clearance), or replace with stronger neodymium-based magnetic snaps.
Hardware Selection By Project Type
Each project type has a typical hardware requirement. Use the table below as a starting point.
| Project | Typical Hardware | Quantity | Recommended Finish | Notes |
|---|---|---|---|---|
| Bifold wallet | Line-20 snap (optional) | 1 | Match dye color | Many wallets use no hardware |
| Card holder | None | 0 | — | Stitching only |
| Belt (1.5 in) | Buckle, 4-6 rivets | 1 + 4-6 | Brass or nickel | Match buckle to leather color |
| Watch strap | Buckle, line-16 snap, 4 rivets | 1 + 1 + 4 | Brass or nickel | Hardware visible against skin |
| Key fob | Trigger swivel, 2-4 rivets | 1 + 2-4 | Brass | Brass develops patina with use |
| Dog lead | Trigger snap, 1 D-ring, 4-6 rivets | 1 + 1 + 4-6 | Brass or stainless | Stainless for outdoor use |
| Tool roll | 2-4 eyelets for ties | 2-4 | Brass | Eyelets reinforce ties |
| Bag (small messenger) | Magnetic snap, 2 D-rings, 1 buckle | 1 + 2 + 1 | Brass or antique brass | Match all hardware finish |
Linked deep-dives for projects in this matrix: bifold wallet build, card holder pattern, best wallet leather guide. The stitch length guide covers the spacing decisions that pair with hardware placement (rivets typically span 4-6 stitch holes for proper reinforcement).
Before stitching a glued seam, the guide to the best glue for leather covers which adhesive holds each joint type and how to prep the surface so it grips.
Frequently Asked Questions
What rivets are best for leather?
Solid copper or solid brass double-cap rivets in 6-7 mm length for wallets and 9-10 mm for belts. Solid copper is strongest and develops the most beautiful patina; solid brass is a close second and cheaper. Avoid aluminum and unmarked plated rivets — they fail under stress.
What size snap do I need for a leather wallet?
Line-20 (12.5 mm cap diameter) is the standard for bifold wallets and small bags. Line-16 suits watch straps and thin cuffs; line-24 suits heavy belts and structured bags. Buy line-20 first — it covers the most common projects.
Do I need a press to set leather snaps?
No. A $10-25 hand-tool kit (concave anvil plus matching strikers) sets snaps cleanly with practice. Presses are faster and more consistent, but only become worthwhile at 30 plus projects per year. For under 30 per year, hand tools save money without quality loss.
What is the difference between rivets and Chicago screws?
Rivets compress permanently and cannot be removed without drilling. Chicago screws thread together and can be removed and reset without damage. Use rivets where strength matters most (belts, bag handles); use Chicago screws where future adjustment may be needed.
How do I match hardware finish to leather color?
Warm leather colors (saddle tan, walnut, bridle brown) pair with brass or antique brass. Cool leather colors (charcoal, black, navy) pair with nickel or black hardware. Match all hardware to one finish for a professional look; mix only as a deliberate design contrast.
Why is my brass hardware turning green?
Normal patina from skin oils and oxidation. Brass develops a deeper gold tone with use, eventually showing green-blue spots in crevices. This is desirable on heritage-style work. Polish with mild brass cleaner if you want to restore the original shine.
What is a Chicago screw?
A Chicago screw is a two-piece threaded fastener — a post with internal threads on one side, a cap with matching male thread on the other. They thread together through the leather and lock with thread tension. They can be removed and reset, unlike rivets.
Related Guides
- Best Rivets for Leather: Copper vs Brass vs Stainless
- How to Set Snaps on Leather Without a Press
- Leatherworking Starter Kit Guide
- Leather Working for Beginners: Complete Starter Guide
- How to Make a Leather Bifold Wallet