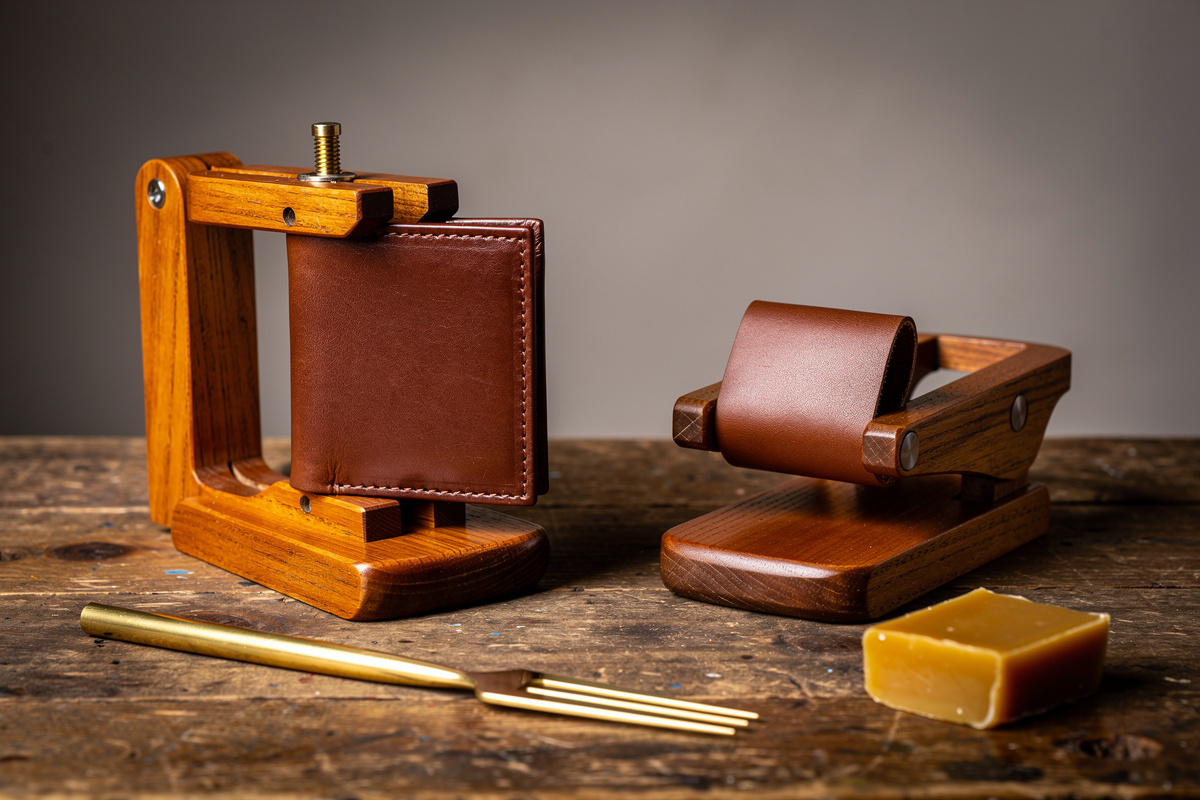
A stitching pony — the vertical free-standing bench-top fixture you sit on — holds leather more rigidly and is faster for projects under 12 inches; a stitching clamp…
A stitching pony — the vertical free-standing bench-top fixture you sit on — holds leather more rigidly and is faster for projects under 12 inches; a stitching clamp (the smaller hand-held or knee-braced version) is more portable, costs $30 to $50 less, and handles longer pieces like belts that won’t fit in a pony. Most leatherworkers eventually own both, but if you’re picking one as your first stitching fixture, the pony is the better long-term value. The leather stitching techniques hub covers where workholding fits alongside chisel, needle, thread, and saddle-stitch motion decisions.
The right answer depends on what you make. Wallets, card holders, watch straps, and small leather goods sit perfectly in a pony’s clamping zone. Belts, dog leashes, rifle slings, and bag straps need to be repositioned every 6 to 12 inches in a pony but pass through a clamp continuously. This guide walks through the mechanical differences, the failure modes, and the projects where each tool wins.
I used a benchtop stitching clamp for my first year because it was $25 cheaper than a pony. Every belt I made required repositioning the clamp three times per foot, leaving witness marks where the jaws had bitten the leather. When I finally built a pony from scrap oak and a carriage bolt, my stitch consistency improved more in one weekend than in the previous six months. The roughly $25 in materials and an afternoon of woodworking paid back in every project since.
What a Stitching Pony Actually Does
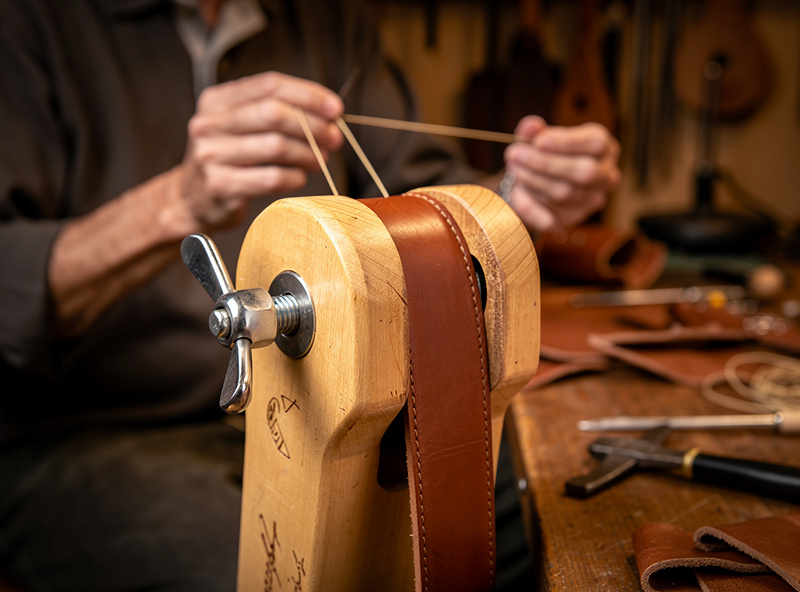
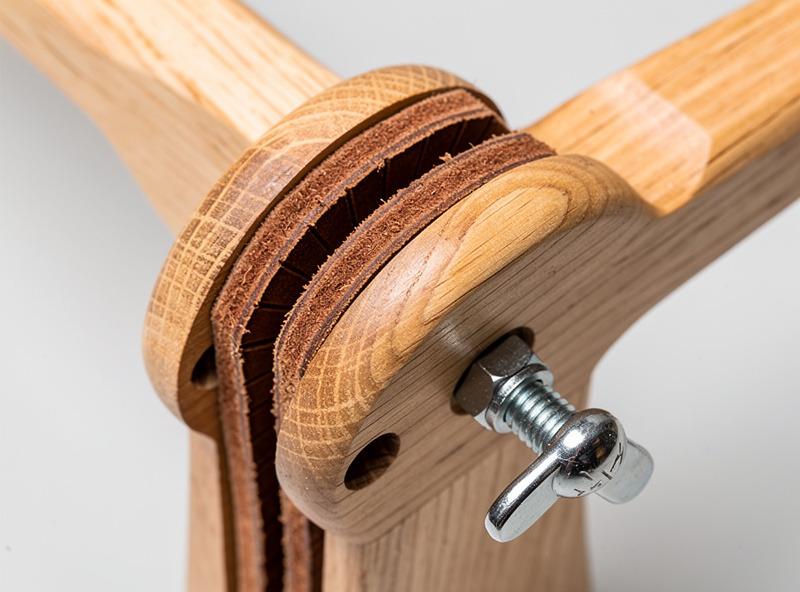
A stitching pony is a wooden frame with two vertical jaws connected by a clamping mechanism — usually a single wing nut, sometimes a quick-release lever — and a horizontal seat board between the front legs. You sit on the seat, the leather is clamped vertically between the jaws at chest height, and both your hands are free for needle work.
The mechanical advantage of a pony is that your bodyweight stabilizes the entire fixture: there is no slip, no sway, and the leather sits at a fixed angle for every stitch. For saddle stitching, that fixed-angle clamping is what allows consistent thread tension across hundreds of stitches in a row. The pony’s vertical orientation also lets gravity hold the bottom of long pieces straight while you stitch the top.
Premium ponies (Wuta, Sinabroks, Vergez Blanchard) cost $80 to $250 and use steel hardware; budget DIY ponies built from a half-sheet of plywood cost about $25 in materials. The expensive ponies hold tension longer because their jaws are wider and the wing nut threads engage more wood, but a well-made DIY pony works fine for hobby use.
What a Stitching Clamp Actually Does
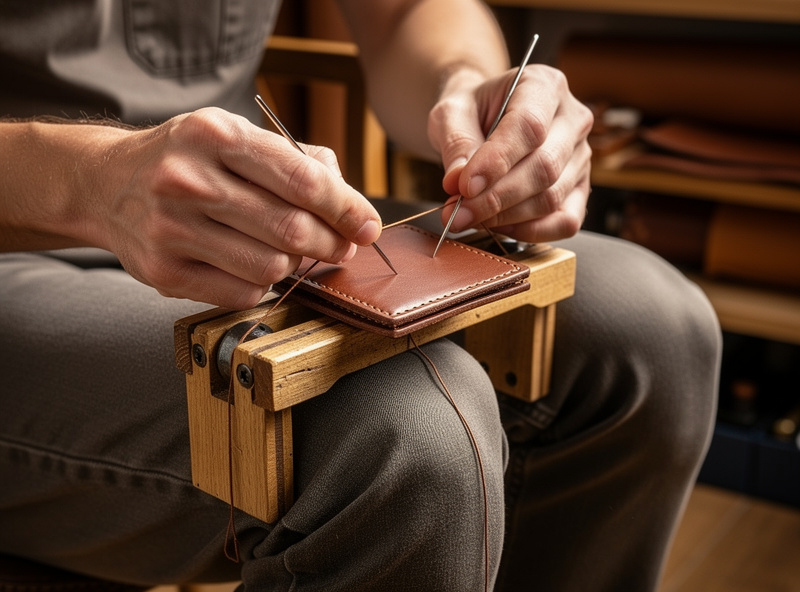
A stitching clamp is the same vertical-jaw concept without the bench seat. Most clamps are 12 to 18 inches tall, designed to be held between your knees while you sit on a regular chair, or set on a workbench between two bench dogs. The Wuta knee clamp and the classic French “Pince à Coudre” style both follow this pattern.
The trade-off is leverage: without your bodyweight pinning the fixture down, the clamp can rock side-to-side as you pull stitches tight. The Wuta and Sinabroks clamps mitigate this with weighted bases, but knee-braced clamps still drift slightly during long stitching sessions. For 20 to 50 stitch projects this is invisible; for 200+ stitch belts the drift accumulates into stitch-line crookedness.
Clamps cost $20 to $80 — substantially less than ponies — and they fit in a drawer or a tool roll. For traveling crafters, weekend leather classes, or small apartments where a 24-inch wooden fixture is unwelcome furniture, the clamp is the only practical choice. A knee-braced clamp also lets you work in a comfortable armchair rather than a hard wooden seat.
Stitching Pony vs Stitching Clamp: Mechanical Comparison
| Factor | Stitching Pony | Stitching Clamp |
|---|---|---|
| Stability under tension | Highest — pinned by bodyweight | Moderate — knee or bench dog dependent |
| Workpiece capacity | Best for 1 to 12 inch pieces | Handles any length (reposition often) |
| Stitching speed | 20 to 30% faster on small goods | Slower per stitch but no setup time |
| Footprint when stored | ~15 x 20 x 30 inches | Fits in a drawer |
| Typical price | $80 to $250 (premium); $25 DIY | $20 to $80 |
| Posture | Sit on the pony; back upright | Sit in any chair; varies |
| Best for | Wallets, watch straps, small goods | Belts, leashes, travel work |
| Worst for | Belts longer than 18 inches | 200+ stitch precision lines |
How Each One Affects Stitch Quality
Stitch consistency is a function of two variables: the angle the leather sits at relative to your hands, and the tension you can hold through each pull. A pony locks both — the angle is fixed at clamp height, and your bodyweight on the seat prevents any movement. The result is that stitch length and thread tension stay uniform from the first stitch to the last.
A clamp wins on angle (the leather sits where you brace it) but loses on tension stability. When you pull a saddle stitch tight, both threads exert ~5 to 15 lbs of force pulling the fixture toward you. A pony’s 8 to 12 lb seat-and-frame mass plus your bodyweight resists this perfectly; a 3 lb clamp braced against your knees rocks slightly and you compensate with your hands, which adds tiny variations in tension.
For wallet interiors, watch straps, card holders, and any project where the stitch line is the visual focus, the pony’s stability is worth the price difference. For bag straps, dog collars, and belts where the buckle hardware draws the eye away from the stitch line, the clamp’s lower precision is invisible. Match the tool to the visibility of the stitching.
The Length-Limit Problem
A typical stitching pony has a clamping zone of 4 to 8 inches between jaws. Anything longer hangs out the sides, and the section being stitched needs to be repositioned every time the working area moves past the jaws. For a 36-inch belt with stitching every quarter inch on both edges, that’s 8 to 12 reclamping cycles, and each cycle requires re-tightening the wing nut and repositioning your work height.
A clamp held between knees lets you simply slide the leather through the jaws as stitching progresses — no wing-nut adjustment, no repositioning. For long pieces this saves 5 to 15 minutes per project and reduces the chance of stitch misalignment at the reposition seams. This is why production belt makers almost always use clamps despite owning ponies for their other work.
If you primarily make belts, leashes, rifle slings, or guitar straps, the clamp is the better single-tool choice. If you make wallets, watch straps, sheaths, and small goods, the pony is the better single-tool choice. The tools are complementary, not competitive.
Specific Models Worth Considering
At the entry level, Tandy’s own Craftool lacing-stitching pony (about $35) is the usual starting point, with their larger Craftool stitching pony (about $90) a step up if you build bigger pieces. Tandy doesn’t sell a dedicated stitching clamp under its own name — for an entry-level clamp, hobbyists mostly land on the Wuta knee clamp instead. The Tandy ponies are made from softwood and the wing nuts loosen over time, but they handle hobbyist volume for years. If you want to upgrade later, the build quality is enough to learn whether you actually use the tool.
Mid-tier picks: Wuta makes both a stitching pony (around $45) and a matching knee clamp in beech and steel — the clamp runs meaningfully less than the pony, and together they’re the value-for-money sweet spot, sold direct from their site and through Amazon/eBay resellers. Sinabroks (around $85 to $90 for the pony) is the next step up, made in South Korea with brass and stainless hardware and a broader jaw width; its clamp sits proportionally below the pony price the same way Wuta’s does. Both brands ship internationally with predictable lead times.
Premium tier: Vergez Blanchard’s traditional French pony ($220) and Kevin Lee’s hardwood pony with brass-and-steel hardware ($280+) are buy-it-for-life tools that hold tension perfectly for decades. Most hobbyists never need this level, but if you’re stitching 5+ hours a week, the comfort and longevity justify the price. The leatherworking tools cluster covers tool selection across the full price range.
DIY Build vs Buying
A DIY stitching pony is a weekend woodworking project: a half-sheet of 3/4″ plywood, a 5/16″ carriage bolt with wing nut, two strips of scrap leather glued to the jaw faces as padding. Total cost about $25, total build time 3 to 4 hours including finish. Free plans are available from multiple leathercraft YouTube channels and the Reddit r/leathercraft sidebar.
The catch is that the carriage-bolt mechanism on most DIY ponies wears out after 12 to 24 months of regular use because soft plywood doesn’t hold threads well. A commercial pony with steel-insert thread sleeves lasts 10+ years. If you’ll use the tool weekly, the $80 Wuta pony is the better value than rebuilding a DIY pony every other year.
For clamps, the DIY math is worse: a knee clamp depends on precise jaw fit, and the fixed angle on quality production clamps takes a router and a jig to reproduce. Most crafters who tried building their own ended up buying a commercial clamp within a year. The projects cluster documents which tools repay the investment fastest.
For the step-by-step two-needle method with the exact count rhythm, the how to saddle stitch tutorial walks through the full back-needle-first lock from prep to finish.
Frequently Asked Questions
Do I need both a stitching pony and a stitching clamp?
Eventually yes if you make both small leather goods and belts, but start with one. Pick the pony if you mostly make wallets, watch straps, and sheaths under 12 inches; pick the clamp if you mostly make belts, leashes, and longer pieces or need portability.
Can I saddle stitch leather without a pony or clamp?
Yes, but only for very small pieces under 4 inches. Pinning the leather under your forearm or against a desk works for keychains and watch straps, but anything longer will twist and the stitch will be uneven. A $20 clamp solves this immediately.
Why is the stitching pony so much more expensive than a clamp?
More wood, more hardware, and a built-in seat board. The pony is also a piece of furniture you sit on, so it has to support 200+ pounds without breaking. A clamp only has to grip leather, which takes much less material and joinery.
Is the Tandy stitching pony worth buying?
As a starter tool yes — about $35 gets you a working basic pony for years of hobbyist use (their larger version runs about $90). The wing nut loosens over time and the wood is softer than premium ponies, but it is enough to learn whether you want to upgrade to a Wuta or Sinabroks down the road.
How tall should a stitching pony be?
The clamp jaws should sit at chest level when you are seated on the pony itself, roughly 30 to 36 inches from the floor. Too low and you hunch over the work; too high and your shoulders fatigue. Most commercial ponies are 32 to 34 inches and fit the average adult.
Can I use a stitching pony for tooling and stamping?
No — tooling and stamping require a flat solid surface (granite slab, marble tile, or hardwood block) to absorb the mallet impact. The pony’s vertical clamping is only useful for stitching. See the leatherworking tools cluster for the full bench setup.
Related Articles
- Leatherworking Tools Guide
- Leather Stitching Techniques cluster
- Leathercraft for Beginners cluster
- Leather Projects cluster
- Edge Finishing cluster