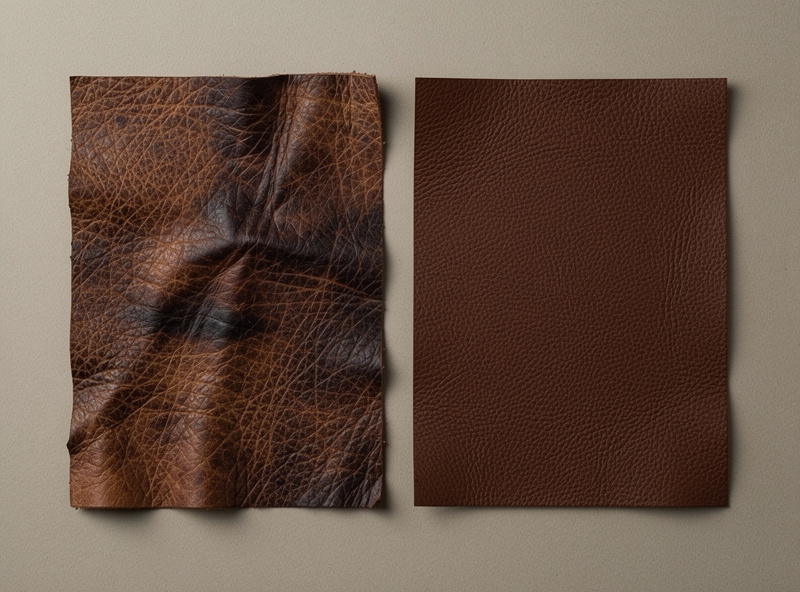
Streaks and blotches in leather dye come from one of three causes: surface oils blocking absorption (handprints, dust, manufacturing residue), an applicator that drags dye instead of spreading…
Streaks and blotches in leather dye come from one of three causes: surface oils blocking absorption (handprints, dust, manufacturing residue), an applicator that drags dye instead of spreading it (sponge, brush), or single heavy coats instead of multiple thin ones. Fix all three and the dye job is even on the first try with no patching required. For the full prep-and-application playbook, the leather dyeing guide covers the four chemistry families and the fixes for the eight most common dye failures.
The reliable sequence: deglaze with a 50/50 acetone-and-deglazer wipe, let it flash off for 5 minutes, apply Fiebing’s Pro Dye in long parallel strokes with a wool dauber dauber, wait 30 seconds for the first coat to absorb, then apply a second thin coat in perpendicular strokes. Total prep-and-dye time is about 10 minutes per panel, and the result is uniform color edge to edge.
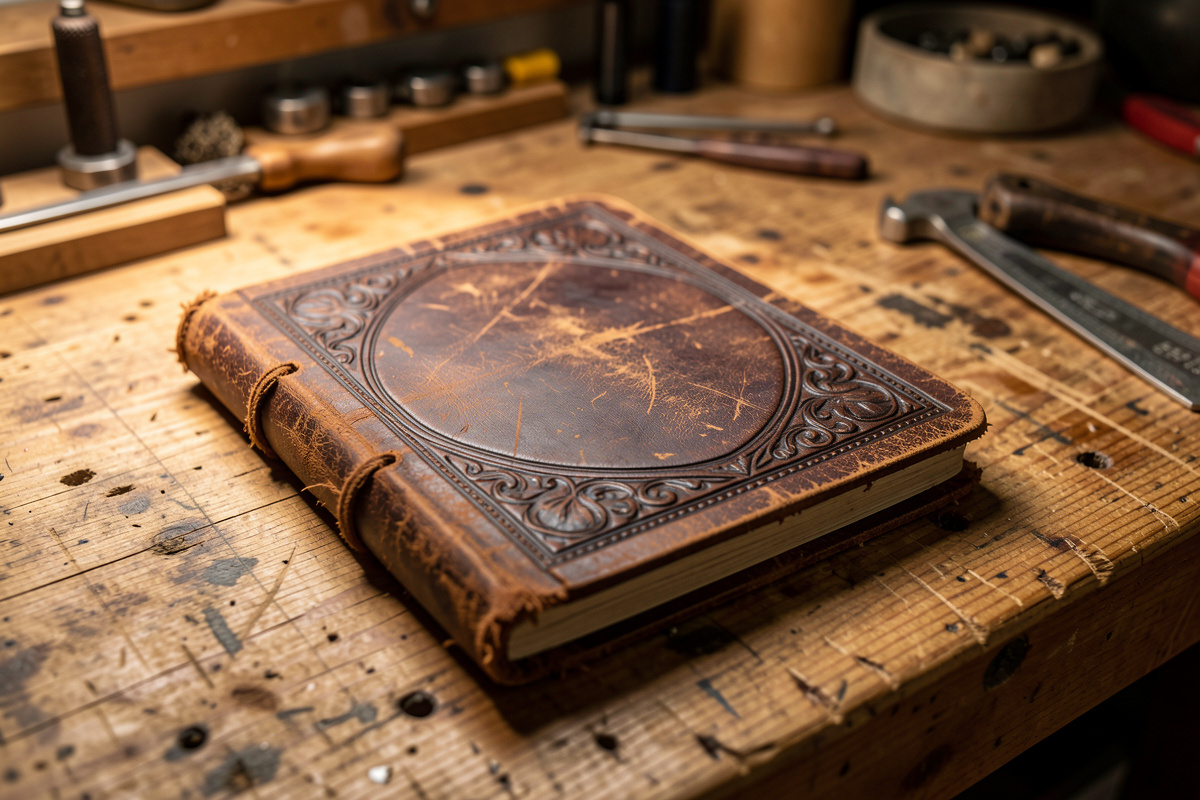
I ruined the front face of a $22 Hermann Oak shoulder piece with blotchy Fiebing’s dye because I skipped the deglazing step. The dark fingerprints around the edges were literally my own hand oils creating a resist pattern. Now I wipe every piece with a 50/50 deglazer-acetone mix and wait exactly five minutes before dye touches leather. The leather dyeing guide has the full prep-and-seal sequence that would have saved me that hide.
As an Amazon Associate I earn from qualifying purchases.
Why Streaks Happen in the First Place
Untreated veg-tan leather has invisible surface oils everywhere — from the tannery’s finishing process, from your hands during cutting and stitching, from dust settling during storage, from the workbench surface itself. These oils are hydrophobic and they create resist patterns: dye flows around them instead of through them. The result is dark patches where the leather was clean and pale rings where oils sat.
Beginners typically respond by applying more dye, which makes the dark patches darker and the streaks worse because the unblocked areas absorb extra pigment while the blocked areas stay pale. The fix isn’t more dye — it’s removing the surface oils before any dye touches the leather. This is what deglazing does.
The second cause is applicator choice. Sponges and foam brushes hold dye in pockets and release it unevenly as you stroke; bristle brushes streak because the bristles drag pigment in lines. Wool daubers (a small ball of natural wool on a wire handle) absorb dye uniformly and release it in a steady film, which is why every leather supplier stocks them as a cheap consumable — a few dollars each from Tandy Leather or straight from Fiebing’s.
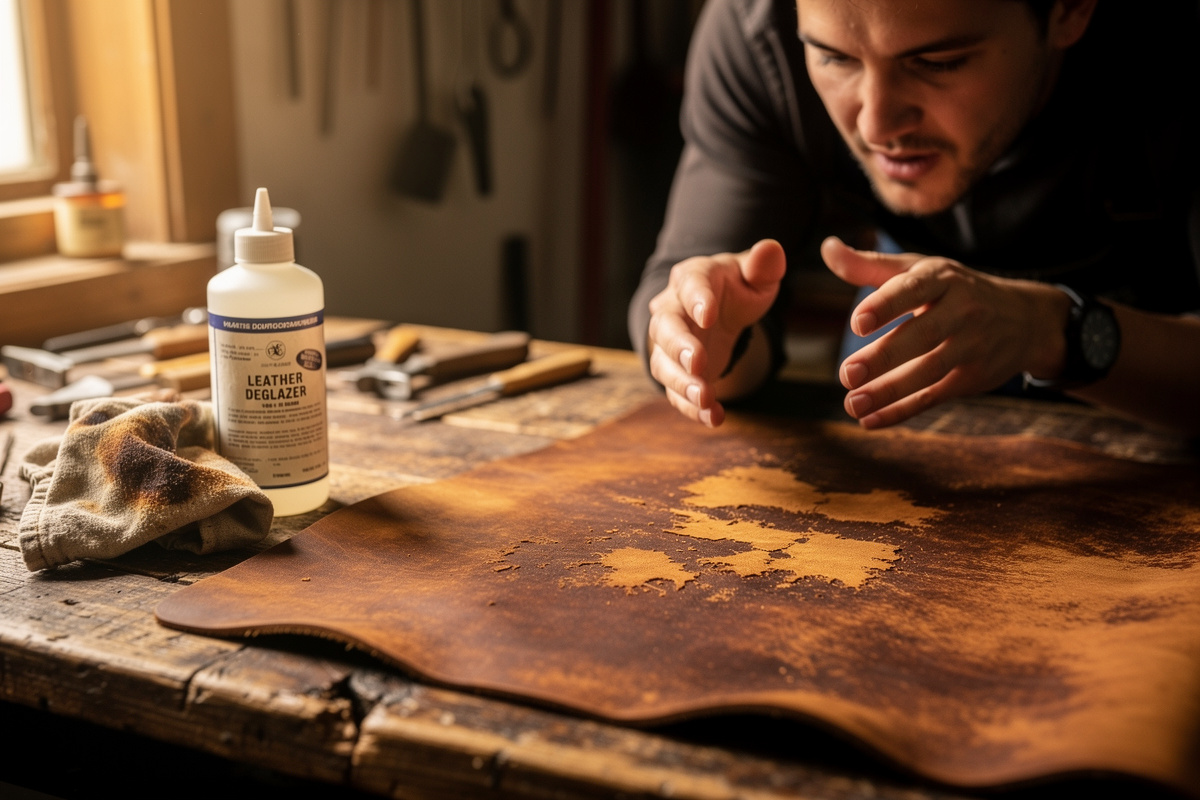
Step 1: Deglaze the Surface
Mix equal parts pure acetone and Fiebing’s Deglazer in a small glass jar (don’t use plastic — acetone melts most plastics). Saturate a clean wool dauber with the mix and wipe it across the entire grain side of the leather in long even passes, slightly overlapping each pass. The leather will darken briefly as the deglazer wets the surface; this is normal.
Let the deglazed panel sit for 5 minutes in a well-ventilated space (open window, garage door open, or a fan pulling air past the bench) — Fiebing’s own Deglazer safety data sheet classifies the product as highly flammable with vapor that can cause drowsiness or dizziness, and calls for use only outdoors or in a well-ventilated area with no open flame or spark source nearby. I keep a lid on the mixing jar between wipes and never deglaze near the laser or grinder side of the shop. The acetone evaporates and lifts the surface oils with it, leaving the leather fibers ready to absorb dye uniformly. If you skip the wait, residual acetone can dilute the first dye coat and cause streaks anyway.
Pure deglazer works without acetone but takes 2 to 3 wipes to remove the same amount of oil. The 50/50 acetone mix is faster and cheaper because you use less Fiebing’s Deglazer per project. If acetone isn’t available, use 99% isopropyl alcohol — slightly less effective but acceptable.
Step 2: Choose the Right Dye for the Project
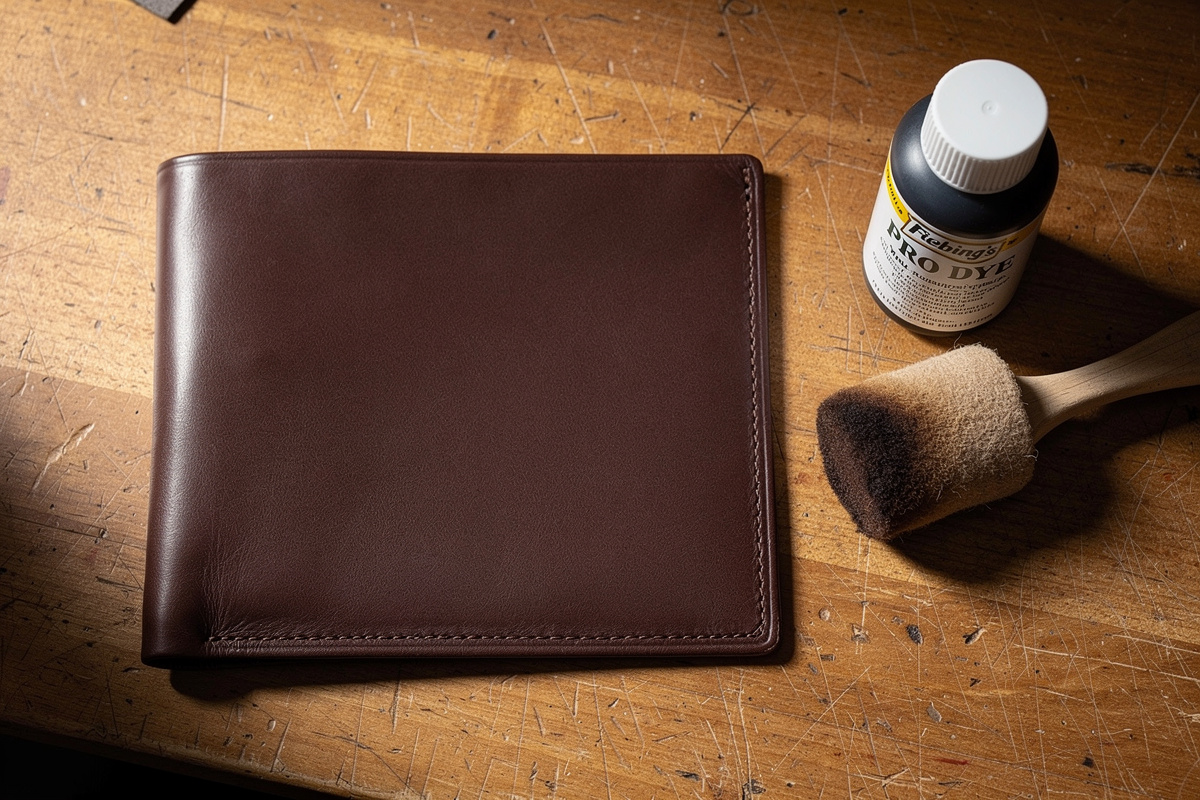
Three Fiebing’s dye lines cover most projects. Standard Leather Dye (alcohol-based) is the highest-pigment formula but can blotch on heavy stock — best for small leather goods where you want maximum color depth. Pro Dye (Pro Oil Dye, oil-based) penetrates deeper, dries to a more even tone, and is the standard for wallets and bags. USMC Black is a heavier-pigment black formulation specifically for getting dark uniform black on heavy leather.
Pro Dye is the all-around best pick for beginners because the oil base gives a longer working window (90 to 120 seconds vs 30 to 60 seconds for alcohol-based) and is more forgiving of slow application. The trade-off is slightly less pigment intensity per coat, which usually means 2 coats instead of 1 — but 2 thin coats give better results than 1 heavy coat anyway.
Match the dye to your final color goal. Saddle Tan, Light Brown, and Medium Brown read warm; Dark Brown, Mahogany, and Walnut read deep amber; Black, Navy Blue, and Wine Red read cool. Test the dye on a scrap from the same hide before committing — different hides absorb the same dye to slightly different final shades because of tannage variation. The leather types cluster covers tannage and dye interaction.

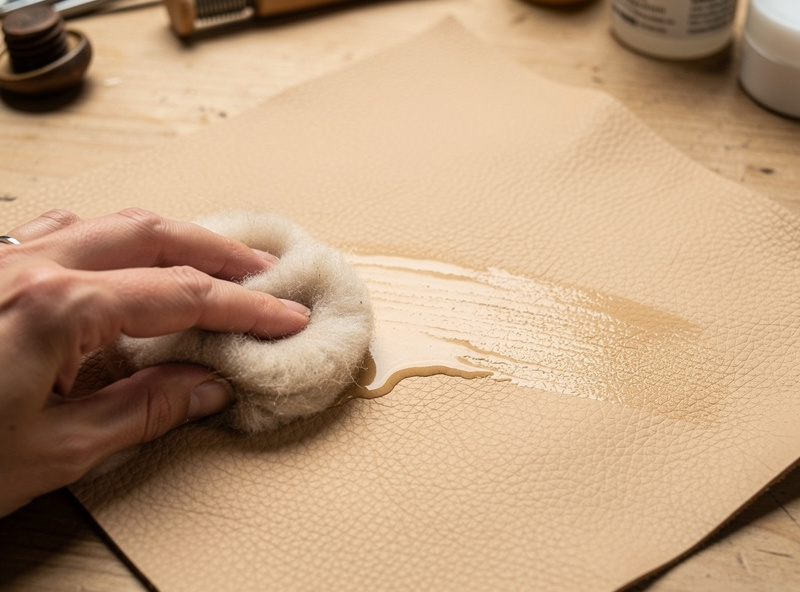
Step 3: Apply the First Coat — Long Parallel Strokes
Pour about a teaspoon of dye into a small dish (don’t dip the dauber directly into the dye bottle — contaminated dauber returns the contamination to the bottle). Saturate the dauber but don’t drip — squeeze excess dye against the dish edge. Apply to the leather in long parallel strokes that run the full length of the panel, slightly overlapping each stroke.
Work fast for alcohol-based dye (30 to 60 second window before the surface starts to set), slower for Pro Dye (90 to 120 second window). Don’t go back over an area that’s already absorbed — that creates a darker stripe where the second pass added pigment to an already-dyed surface. If you missed a spot, leave it for the second coat.
Move the panel under angled light as you work so you can see exactly which areas are wet and which have already absorbed. The dyed surface looks slightly glossy when wet and matte when dry; the visual difference tells you where to apply the next stroke.
Step 4: Wait, Then Second Coat in Perpendicular Strokes
Wait 30 seconds (alcohol dye) or 60 to 90 seconds (Pro Dye) for the first coat to absorb. The leather should look uniformly damp but not pooling. Apply the second coat in strokes perpendicular to the first — if the first coat went horizontal, the second goes vertical. The cross-hatch pattern fills any micro-gaps the first coat missed.
The second coat is always thinner than the first. Saturate the dauber, then squeeze almost dry against the dish edge so you’re applying a film of dye rather than a wet pool. This second-coat-thin technique is what separates uniform results from streaky ones; flooding the second coat undoes the first coat’s even base.
For high-saturation colors (deep black, oxblood, navy), add a third coat after another 30 to 60 seconds in diagonal strokes. Three coats applied this way reach maximum saturation without blotchy patches. Stop at three — additional coats stop adding pigment and start sitting on the surface as residue.
Step 5: Cure, Buff, Then Seal
Let the dyed leather cure for 24 hours in a well-ventilated space at room temperature. Don’t accelerate with heat — heat causes uneven solvent evaporation and can leave color blotches. After 24 hours, buff the surface with a clean dry rag to remove unbound pigment from the surface. Buffing reveals the true cured color, which is usually about 1 shade lighter than the wet dye looked.
Seal with one thin coat of Resolene or Tan-Kote diluted 50/50 with water, applied with a clean wool dauber in the same long-parallel-stroke pattern as the dye. The sealer prevents dye from rubbing off on clothing and gives a satin finish. Skipping the sealer means the dye continues bleeding for weeks; sealed dye stops bleeding within a few days.
For a glossier finish, apply a second sealer coat after the first dries (about 4 hours). For a matte finish, mix Resolene 1:2 with water for the first coat. The edge finishing cluster covers sealer-to-finish-quality matching for various project types.
Streak Diagnosis Cheat Sheet
| Streak Pattern | Cause | Fix Next Project |
|---|---|---|
| Pale rings around dark patches | Surface oils (no deglazing) | Deglaze with 50/50 acetone+deglazer |
| Linear dark stripes parallel to strokes | Foam brush or sponge applicator | Switch to wool dauber |
| Random dark patches across panel | Single heavy coat, dye pooled | 2 thin coats; dauber squeezed almost dry |
| Pale patches at fingertip locations | Handling oils after deglazing | Wear nitrile gloves after deglaze |
| Hairline scratches show in finish | Sanded edge bled into grain | Sand bevel before grain dyeing |
| Dark crease at fold lines | Dye pooled in folds during drying | Lay flat, not folded, during cure |
| Surface looks chalky after cure | Unbound pigment never buffed | Buff with dry rag before sealing |
Color-Specific Tips
Black is the hardest color to apply evenly because the high pigment load amplifies any blotching. Use USMC Black or Pro Dye Black, two thin coats minimum, three for deep saturation. If the result is uneven, hit the pale areas with a third targeted coat using a smaller dauber, then re-buff and re-seal the entire panel.
Dark brown (Mahogany, Walnut, Dark Brown) is the most forgiving — the slightly variable absorption looks like natural patina rather than a defect. This is why most beginner projects start in this color range. Light browns and tans show every imperfection; commit to perfect prep before attempting them.
Reds, oxblood, and burgundy benefit from a base coat of brown applied first to deepen the final color. Apply the base brown, let it cure 4 hours, then apply 2 coats of red on top. The result is a richer multi-dimensional color than red alone. The leather dyeing cluster covers the antique two-tone finish technique that uses this layering approach.
For the full 8-brand ranking with side-by-side penetration tests, the guide to the best leather dye for veg-tan covers Fiebings, Angelus, Wuta, and five more on identical Hermann Oak panels.
For the full thinning and application method, the guide to resolene covers the 50/50 water dilution and the three-coat sequence that prevents cloudy streaks.
Frequently Asked Questions
What is the best applicator for dyeing leather without streaks?
A wool dauber — a small ball of natural wool on a wire handle, sold for a few dollars at most leather suppliers. Wool absorbs dye uniformly and releases it in a steady film, unlike sponges (which pool) and brushes (which streak). One dauber per color avoids cross-contamination.
Do I have to deglaze leather before dyeing?
Yes for even dye coverage. Surface oils from manufacturing, handling, and storage create resist patterns that block dye absorption and cause pale rings. A 50/50 mix of acetone and Fiebing’s Deglazer wiped on with a wool dauber removes them in 5 minutes.
How many coats of leather dye should I apply?
Two thin coats for most colors, three for deep black or oxblood. The first coat is full coverage in long parallel strokes; the second is thinner in perpendicular strokes to fill micro-gaps. Stop at three coats — additional coats sit on the surface instead of absorbing.
How long does leather dye take to cure?
24 hours at room temperature in well-ventilated space. Do not use heat to accelerate — heat causes uneven solvent evaporation and color blotches. After 24 hours, buff with a dry rag and seal with Resolene or Tan-Kote diluted 50/50 with water.
Why does my leather dye rub off on clothes?
Unsealed dye continues bleeding for weeks. Buff the cured surface with a dry rag to remove unbound pigment, then apply one thin coat of Resolene or Tan-Kote diluted 50/50 with water. Sealed dye stops bleeding within a few days.
Fiebing’s Standard Dye vs Pro Dye — which is better for beginners?
Pro Dye for beginners. The oil base gives a 90 to 120 second working window vs 30 to 60 seconds for alcohol-based standard dye, so it is more forgiving of slow application and produces more even results across heavy leather. Standard dye gives slightly more pigment intensity per coat.
Related Articles
- Leather Dyeing cluster
- Edge Finishing cluster
- Leather Types cluster
- Leatherworking Tools Guide
- Leather Projects cluster