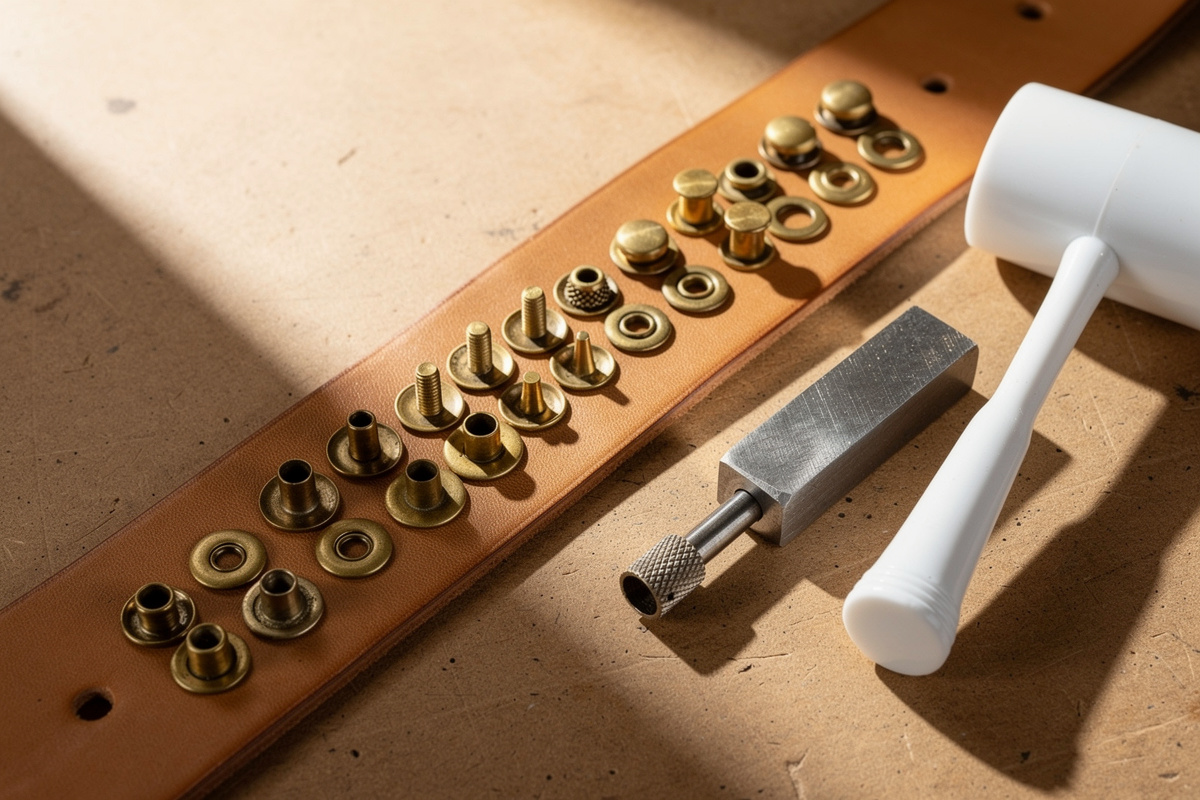
Set leather snaps without a press in three steps: punch a clean hole the size of the snap post (usually 3/16″ or 5/16″, depending on snap line), insert…
Set leather snaps without a press in three steps: punch a clean hole the size of the snap post (usually 3/16″ or 5/16″, depending on snap line), insert the four snap parts in the right order on each side of the leather, then strike a hand-set snap setter with a poly mallet over a steel anvil. The whole sequence takes about 90 seconds per snap once your tools are out, and the result is identical to a $200 press job. For the full hardware-setting context, the leather hardware hub covers rivets, snaps, buckles, and finish matching together.
The hand-tool method works for every common snap size (line 20, line 24, segma) and for the three most popular finishes (nickel, brass, antique brass). The only situation where a press is genuinely required is high-volume production — 50+ snaps in one session — where the press’s consistency saves time. For hobbyist use, the $15 hand setter kit is the better value.
I spent 30 minutes trying to set a line-24 snap with a hammer and a flat punch because the kit didn’t include a proper snap setter. The snap looked fine from the top but wouldn’t close because the stud was crooked underneath. A $12 hand setter kit fixed the problem in 90 seconds per snap. The leather hardware guide covers rivets, snaps, and buckles with the hand-tool methods that actually work.
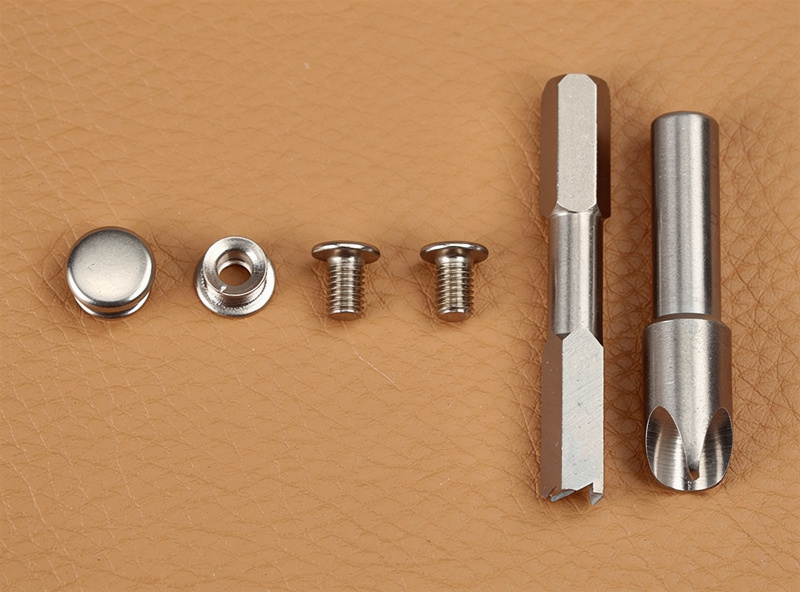
The Four Parts of a Snap (And Which Goes Where)
A standard 4-part snap has a cap (decorative top), socket (female receiver), post (back of the female side, threaded shaft), and stud (male protrusion that clicks into the socket). The cap-and-socket assembly goes on one piece of leather; the post-and-stud assembly goes on the matching piece. When the two pieces of leather come together, the stud clicks into the socket.
The cap is the only visible part on the front of the leather — it’s the decorative round disc you see on a wallet snap or jacket cuff. The other three parts sit hidden between the leather layers or on the back. Choose the cap finish (polished nickel, antique brass, gunmetal) based on the project’s overall hardware aesthetic.
Identify which side of your project gets which assembly before you start. The cap-and-socket goes on the piece that will be visible from the front when the snap is closed; the post-and-stud goes on the strap that wraps over and clicks down. Get this backwards and the snap works mechanically but the decorative cap is hidden inside.
Tools You Actually Need
As an Amazon Associate I earn from qualifying purchases.
Snap setter kit ($12 to $20): includes a concave setter punch (matches the cap diameter), a flared setter punch (matches the post diameter), and a small steel anvil with two recesses (one for the cap, one for the back). Tandy, Weaver, and Ohio Travel Bag all sell these kits sized for line 20 (3/16″ post) and line 24 (5/16″ post) snaps. Buy the kit that matches your snap size — the punches aren’t interchangeable.
Hollow drive punch ($8 to $15): a hardened steel tube with a sharpened edge that punches a clean round hole through leather when struck with a mallet. Buy the size that matches your snap post: 3/16″ for line 20, 5/16″ for line 24 and most segma snaps (segma posts run close to line 24 despite the smaller overall snap). The punch should slide through but not be loose.
Poly mallet ($10 to $20): a hammer with replaceable plastic faces that won’t damage the steel setter punches. A regular steel hammer works in a pinch but mushrooms the setter face after a few hundred strikes. Don’t use a wooden mallet — wood is too soft to drive the setter consistently.
Steel anvil or marble slab: any flat hard surface that can absorb the mallet impact. The 4 x 6 inch granite slab from a stone supplier is the standard ($10), or a leftover marble tile works fine. Don’t strike directly on a wooden bench — the wood absorbs the energy and the snap won’t fully seat.
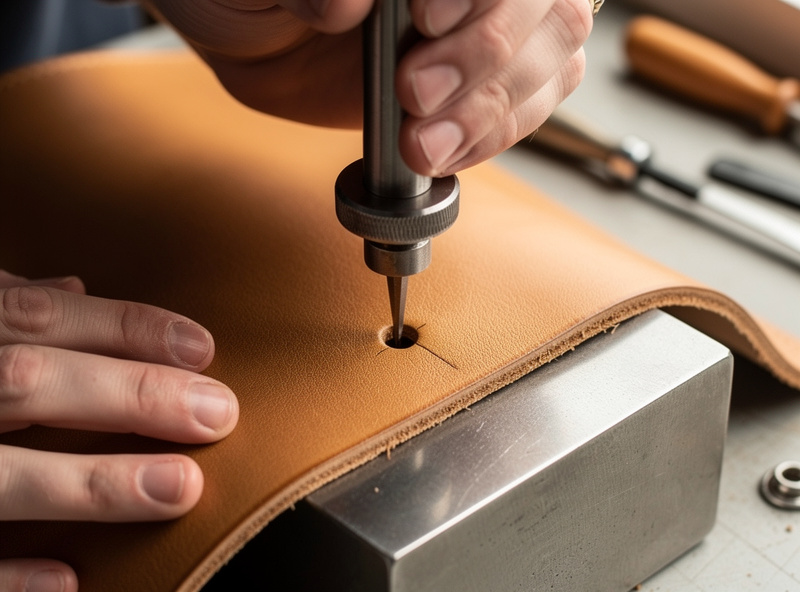
Step 1: Mark and Punch the Snap Hole
Mark the snap location on the leather with a silver pen or fine pencil. For wallet snaps, the standard position is centered horizontally about 12 to 15 mm from the closing edge. For dog collars and watch straps, position the snap so it doesn’t sit directly under any wear point (the buckle area, fold lines).
Place the leather flat on the steel anvil or granite slab. Position the hollow drive punch on the marked spot, vertical, and strike with the poly mallet hard enough to drive the punch all the way through the leather. Lift, twist the punch slightly to release the leather plug, then check the hole. A clean hole has a smooth round edge with no torn fibers.
If the hole is ragged, your punch is dull or the impact wasn’t sharp enough. Sharpen punches by lapping the cutting edge on 600-grit sandpaper for 30 seconds, or replace if the cutting edge has nicks. A dull punch tears the leather instead of cutting it, and a torn snap hole loosens around the post within weeks.
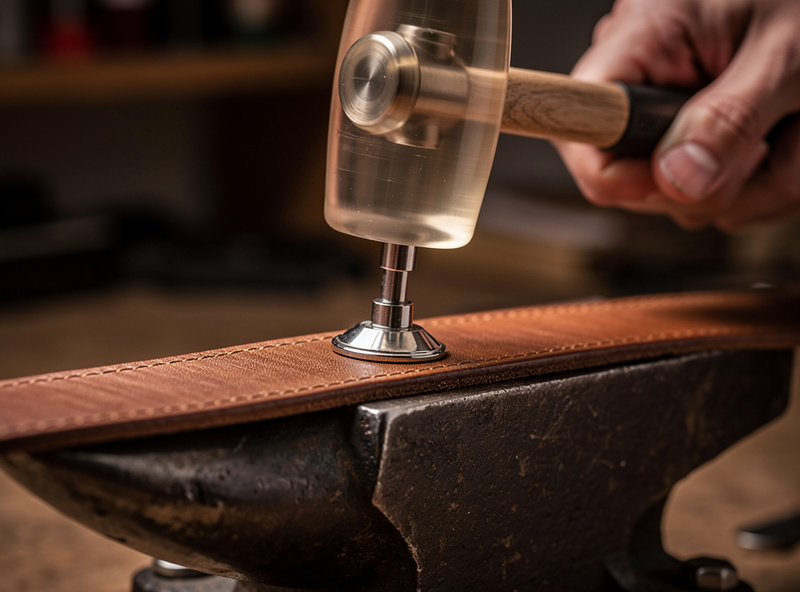
Step 2: Insert the Cap-and-Socket Side
Place the cap (decorative top) on the steel anvil with the dome facing down, sitting in the cap recess. Push the punched leather hole down over the post of the cap so the post sticks up through the grain side of the leather. The cap’s decorative side is now sandwiched between the leather and the anvil; the post sticks up.
Drop the socket onto the post from the top, with the open side of the socket facing up (the side that will receive the stud later). The socket should sit flush against the leather flesh side, with the post sticking up through its center.
Place the concave setter punch over the post, lining up the punch’s inner curve with the socket. Strike straight down with the poly mallet — one firm blow, then a confirming second blow. The punch deforms the post into a flared rivet that locks the socket and cap together. Lift the punch and check: the snap should be permanent, the cap should be flush on the grain side, and the socket should rotate freely under finger pressure.
Step 3: Insert the Post-and-Stud Side
Repeat Step 1 to punch the matching hole in the second piece of leather (the strap or flap that closes over). Position the post (the part with the threaded shaft and small flange) on the anvil with the shaft facing up and the flange in the second anvil recess. Push the punched leather hole down over the post so the shaft sticks up through the flesh side.
Drop the stud (the male protrusion) onto the shaft from the top. The stud should sit flush against the leather grain side. Place the flared setter punch (the one with the small concave tip, not the large concave) over the stud, lining it up with the shaft.
Strike with the poly mallet — one firm blow plus a confirming second blow. The shaft deforms inside the stud and locks the assembly. Lift the punch and check: the stud should be permanent, the post flange should be flush on the flesh side, and the stud should sit firmly without wiggle.
Step 4: Test the Snap
Bring the two leather pieces together so the stud aligns with the socket. Press them together — you should hear and feel a positive click as the stud snaps into the socket. The closed snap should hold the leather pieces together against moderate pulling force (about 2 to 4 pounds, more for heavier line 24 snaps).
If the snap doesn’t click closed, the post wasn’t fully flared and the stud is loose. Re-strike both setter punches with one more firm blow each. If it still doesn’t click, the snap is defective — this happens occasionally with cheap snaps from craft stores. Switch to better-quality snaps from a leather supplier (Tandy, Buckle Guy, Maker’s Leather Supply).
If the snap holds but won’t open easily, the post was over-flared. There’s no fix for this — the snap is permanently stiff. Reduce mallet force on the next snap. Two firm blows almost always set a snap correctly; three or more is over-setting.
Snap Sizes and Project Matching
| Snap Size | Post Diameter | Cap Size | Best For | Hand Setter Kit Price |
|---|---|---|---|---|
| Segma (line 16) | 5/16″ | 10 mm | Watch straps, key fobs, small leather goods | $12 to $15 |
| Line 20 | 3/16″ | 13 mm (1/2″) | Wallets, card holders, light cuffs | $15 to $20 |
| Line 24 | 5/16″ | 14 mm (9/16″) | Dog collars, jacket snaps, belt loops | $18 to $25 |
| Heavy-duty saddlery snap | 1/4″ to 3/8″ (varies by maker — no single “line” standard) | 17 mm+ | Horse tack, heavy bags, work belts | $25 to $35 |
Common Snap Setting Mistakes
Mistake 1: Wrong-size hole. A 3/16″ line 20 post forced into a 5/16″ line 24 hole leaves the snap loose — it pulls out within a week of use. Always match the punch size to the snap post size precisely. Buy a hole punch set rather than estimating with what you have.
Mistake 2: Striking the cap face directly. The cap’s decorative finish dents on direct mallet impact. Always strike the setter punch (which sits on the post or stud), never the cap. The setter punch is shaped to flare the post without touching the cap.
Mistake 3: Soft surface underneath. The anvil must be hard — granite, marble, or steel. Striking on a wooden bench absorbs the impact and the snap won’t fully set. Even a $5 marble tile from a stone supplier solves this.
Mistake 4: Wrong setter punch. The concave punch goes on the cap-and-socket side; the flared (small concave) punch goes on the post-and-stud side. Swapping them mushrooms the parts incorrectly. The kit usually labels each punch by which side it sets.
Snap Repair: Fixing a Loose Snap
A snap that’s loose because the post wasn’t fully flared can be re-set: place the snap back on the anvil, place the appropriate setter punch over it, and strike one more blow. This often tightens it without removing the snap entirely.
A snap that’s loose because the leather hole stretched can’t be repaired in place — the leather has to be patched. Cut a small reinforcement disc from scrap leather, glue it behind the original snap location with contact cement, then punch a new hole through both layers and set a fresh snap. The doubled leather thickness gives the new snap something solid to grip.
For projects where snaps will see heavy use (work bags, dog collars), pre-reinforce the snap location with a 20 mm reinforcement disc behind the snap during initial assembly. The reinforcement adds 20 to 30 seconds per snap and triples the snap’s lifespan. The leather projects cluster covers reinforcement patterns for common project types.
Hand Setter vs Press: When to Upgrade
The hand setter handles up to about 50 snaps per session before fatigue affects accuracy — your second or third strike starts to drift slightly off-center. For weekend hobbyist projects (1 to 5 snaps per project), the hand setter is permanent.
If you make 50+ snap-equipped items per month (custom dog collars, leather aprons, branded merchandise), a benchtop snap press ($150 to $400) reduces fatigue and standardizes setting force. The setup time per session is longer (5 minutes to swap dies for different snap sizes), so it only pays off when the volume justifies it.
Mid-range option: a manual lever-action snap press ($60 to $90) sits between hand setter and benchtop. Faster than hand-striking, slower than benchtop, doesn’t require electricity. Good upgrade for crafters making 10 to 30 snap items per month. The tools cluster covers tool ROI thresholds for hobbyist vs production volume.
For the full material, size, and setting breakdown, the guide to the best rivets for leather covers copper, brass, and steel rivets by project type and load.
Frequently Asked Questions
Can I set leather snaps with just a hammer and screwdriver?
No — the screwdriver tip is too small and the wrong shape to flare the snap post evenly. The post mushrooms unevenly and the snap fails within days. A $12 to $20 hand setter kit with the proper concave and flared punches is the minimum equipment for setting leather snaps reliably.
What size hole punch for line 20 snaps?
A 3/16 inch hollow drive punch for the post diameter. Line 24 and most segma snaps need a 5/16 inch punch. Always match the punch size to the snap post precisely — an oversized hole leaves the snap loose and an undersized hole tears the leather.
Why won’t my leather snap close all the way?
The post was not fully flared during setting. Place the snap back on the anvil, place the appropriate setter punch over it, and strike one more firm blow. If that does not fix it, the snap is defective — switch to better-quality snaps from a leather supplier rather than craft-store snaps.
Do I need a steel anvil to set snaps?
You need any hard flat surface — granite tile, marble slab, or steel anvil all work. The hand setter kit usually includes a small steel anvil with the right recesses. Striking on a wooden bench absorbs impact and the snap will not seat properly.
How long does it take to set a snap on leather?
About 90 seconds per snap once your tools are out: 30 seconds to mark and punch the hole, 30 seconds to position the parts, 30 seconds to set both sides. A hand setter handles 50 snaps per session before fatigue affects accuracy.
Should I reinforce leather behind a snap?
For high-stress applications (dog collars, work bags) yes — glue a 20 mm reinforcement disc of scrap leather behind the snap location and punch through both layers. The doubled thickness triples snap lifespan. Skip reinforcement for low-stress wallet and watch strap snaps.
Related Articles
- Hardware & Findings cluster
- Leatherworking Tools Guide
- Leather Projects cluster
- Leathercraft for Beginners cluster
- Leather Types cluster