Edge creasing is pressing a fine parallel line just inside a leather edge with a heated or hand creaser, both to decorate the edge and to compress and…
Edge creasing is pressing a fine parallel line just inside a leather edge with a heated or hand creaser, both to decorate the edge and to compress and harden it for a cleaner finish. The crease runs a few millimetres in from the edge, parallel to it, and on a finished wallet or strap it is the small detail that separates a considered piece from a plain one. I run a crease on almost every veg-tan edge I finish — it sharpens the whole edge visually and physically firms the leather.
Creasing is the quiet finishing flourish most beginners never try, partly because it looks like a separate craft and partly because a wandering crease line ruins an otherwise clean edge. It is simpler than it looks once you understand what the tool is doing. Here is how I crease edges on the bench, hot and cold, and how to keep the line dead straight.
What an Edge Crease Actually Does
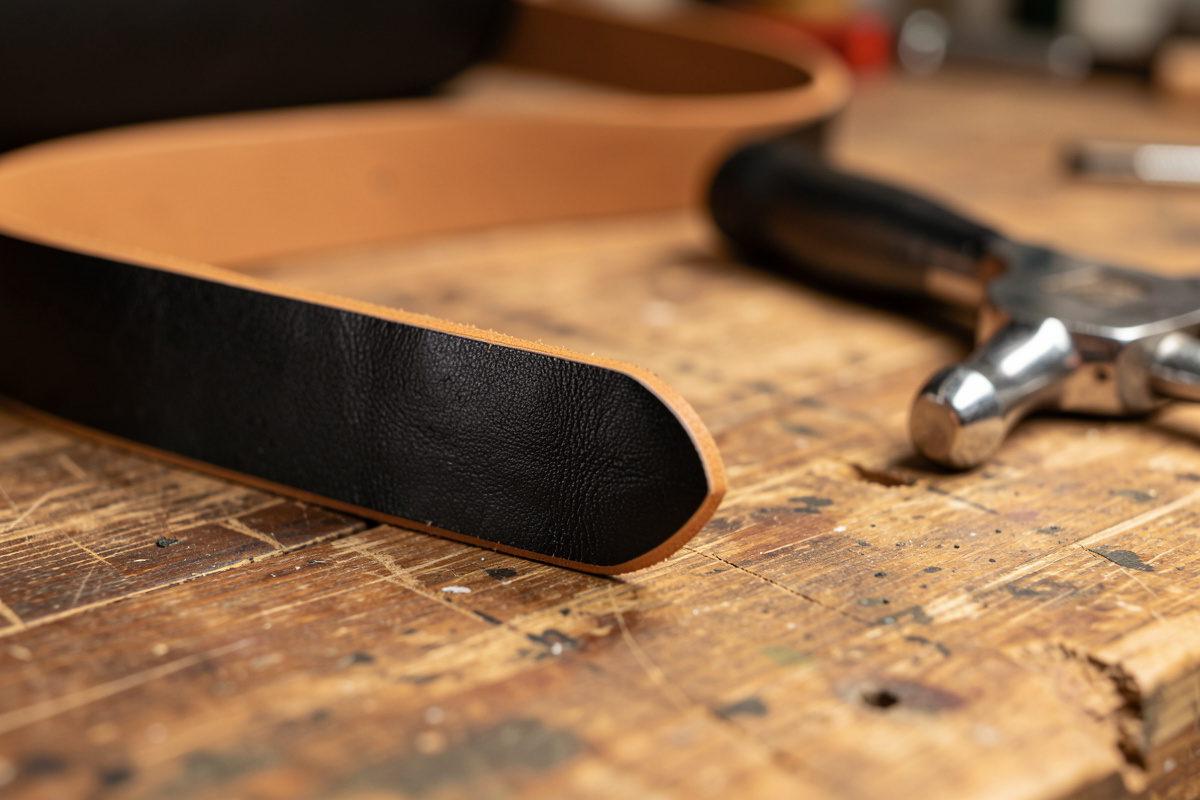
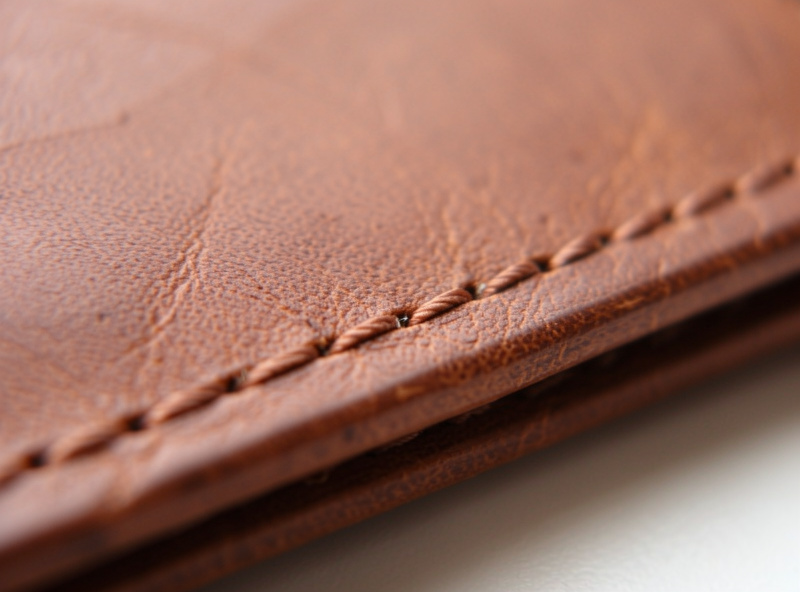
A crease line does two jobs at once: it adds a crisp decorative border parallel to the edge, and it compresses the leather fibers into a hardened channel that makes the edge look more finished and defined. It is part decoration, part structure. The compressed line catches light and frames the edge, and the densified leather along the crease resists scuffing slightly better than the flat surface beside it.
Traditionally the crease also had a functional history of marking a stitch line and firming the edge before the days of modern finishes, and that heritage is why it reads as a mark of quality on a hand-made piece. On my bench it is mostly aesthetic now — a single clean line a few millimetres in that tells the eye the maker cared about the edge. It is the leather equivalent of a tailored seam pressed flat.
Hand Creaser vs Heated Creaser
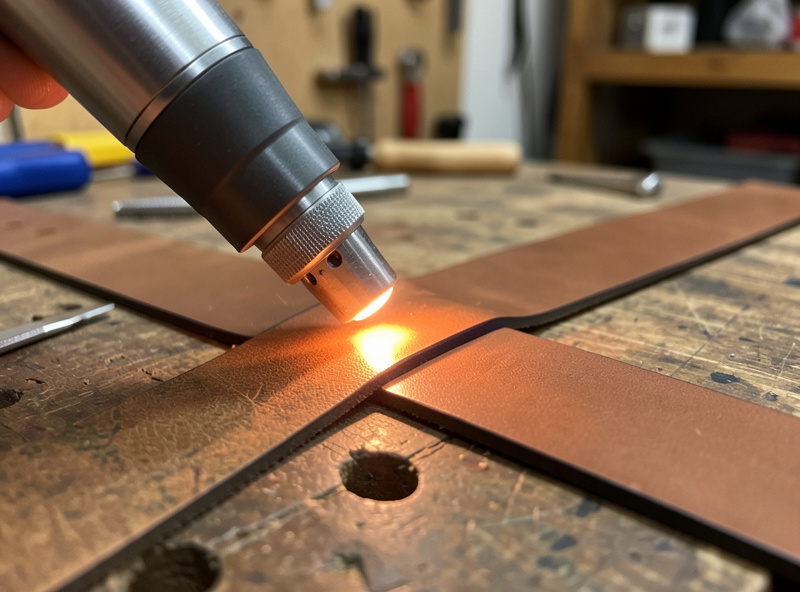
A hand creaser presses a cold line that compresses the leather, while a heated creaser — an electric tool or a hand creaser warmed over a flame — melts and darkens the line for a sharper, more permanent crease. Both follow the same path, but the heated version burnishes the channel as it presses, leaving a darker, glossier, more defined line that does not fade or relax over time.
I use a cold edge creaser for a subtle line on natural veg-tan where I want the compression without darkening, and switch to a heated creaser when I want that crisp dark border that defines a dress belt or a formal wallet edge. The heat does the work — a warm creaser glides and sets the line in one pass, where a cold creaser needs more pressure and several passes to build the same definition. Temperature control matters: too hot scorches and stiffens, too cool just dents.
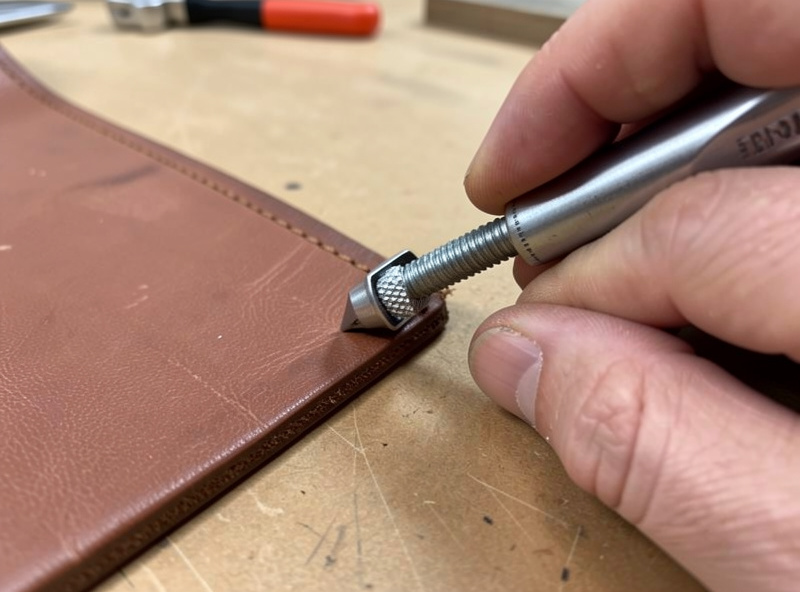
The Screw Crease for Consistent Spacing
A screw crease (or adjustable creaser) has two prongs — one rides the edge as a fence while the other presses the line — set by a screw so every crease sits the exact same distance from the edge. This is the tool that solves the single hardest part of creasing: keeping the line perfectly parallel and the same distance in along the whole edge. The fence prong does the guiding so your hand only has to provide steady forward motion.
For freehand single-line creasers you are relying entirely on a steady hand and often a guide, which is doable on short edges but drifts on long ones. A screw crease makes a belt-length line as straight as a card-edge line, because the spacing is mechanical rather than judged by eye. Once I set the screw for a project’s spacing, every edge on every piece in that batch matches, which is exactly the consistency that reads as professional.
Single Crease, Double Crease, and Bordered Edges
The simplest crease is a single line a few millimetres in, but a double crease — two parallel lines close together — adds a more formal bordered look, and some makers run a crease right at the very edge to define it sharply. The single line is my default because it is clean and hard to overdo; the double crease is a deliberate dress detail that suits a formal belt or a portfolio edge where you want the extra framing.
Running the two lines of a double crease takes a screw crease set twice, or a dedicated double-line creaser, and the spacing between the pair has to stay as consistent as the distance from the edge — twice the chance to drift, twice the reward when it lands clean. I keep double creases for pieces where the extra formality earns it, because on a casual everyday wallet a single quiet line looks more considered than a busy double border. As with everything on the edge, restraint reads as intent: one perfect line beats two slightly uneven ones every time.
How to Crease a Leather Edge
The clean crease is a single steady pass with the fence riding the edge, the leather lightly cased, and consistent forward pressure end to end. Stopping mid-line shows as a divot, exactly like beveling. Here is the sequence I run after the edge is already beveled, sanded and finished:
- Finish the edge first. Crease after burnishing or painting, not before — the crease is the final flourish on a done edge.
- Lightly case veg-tan. A barely damp surface takes a cleaner cold crease; for a heated crease the leather should be dry.
- Set the spacing. Dial the screw crease to your distance, or set a guide for a freehand creaser, and test on a scrap from the same hide.
- Ride the fence and pull in one pass. Keep the guide prong firmly against the edge, steady speed, all the way off the end.
- Re-pass if needed. A second light pass deepens the line; do not try to get full depth in one heavy drag.
On a heated creaser, let the tool reach temperature and test on scrap until the line darkens cleanly without scorching. The motion is identical to the cold version — the heat just sets it harder and darker.
How Far In Should the Crease Sit?
A typical edge crease sits roughly 2 to 4 millimetres in from the edge, scaled to the size of the piece — closer on a fine card sleeve, a little wider on a thick belt. There is no single correct number; the rule is that the crease should feel proportional to the edge it frames and consistent across every edge on the piece. On a slim wallet a crease 2 mm in looks tailored; the same 2 mm on a wide belt looks cramped, so I open it up.
What matters far more than the exact distance is that it never varies within a project. A crease that drifts from 3 mm to 5 mm along one edge reads as sloppy instantly, which is precisely why the screw crease’s fixed fence is worth owning. I set the spacing once on a scrap, confirm it looks right against the piece, then leave the screw untouched for the whole batch so every edge matches the first. If a project mixes a belt and matching keeper loops, I will sometimes run the keepers a hair tighter so they look right at their smaller scale — but each part stays internally consistent.
Common Creasing Mistakes
The most damaging creasing mistake is a wandering line that drifts away from parallel, which happens when the fence prong lifts off the edge mid-stroke or when you crease freehand on a long run without a guide. The fix is mechanical: keep the guide prong pressed firmly to the edge the entire pass, and on long edges use the screw crease rather than trusting your eye. A line that wavers even slightly draws the eye straight to the flaw.
The second common error is scorching with a heated creaser run too hot, which stiffens and discolors the leather beyond the intended dark line and can crack on a flexing edge. Always test the temperature on scrap from the same hide until the line darkens cleanly without burning. The third is creasing too deep in one heavy pass, which can tear a thin edge or leave a ragged channel — build depth with light repeated passes instead. And the quiet one beginners miss entirely: creasing before the edge is finished, so the line lands on a rough surface and emphasizes every flaw rather than hiding them. Crease last, on a clean edge, every time.
Where Creasing Fits in Edge Finishing
Creasing is the last step, applied after the edge is beveled, sanded and burnished or painted — it is the finishing detail, not part of the smoothing sequence. A crease on a rough unfinished edge just emphasizes the roughness, so it only belongs on an edge that is already clean. That is why I treat it as the flourish that tops off the full edge-finishing sequence rather than a step within it.
If your edge is properly beveled and sanded first, the crease lands crisp and parallel on a smooth surface. Skip those and the crease has nothing good to sit on. So creasing rewards everything you did earlier — it is the detail that announces the edge was finished with intent, and it only shines on an edge that earned it.
Some links in this article are affiliate links — if you buy through them I may earn a small commission at no extra cost to you.
Related Guides
- Leather Edge Finishing: The Bevel-to-Burnish Guide
- How to Bevel Leather Edges
- How to Sand Leather Edges
- Edge Paint vs Burnishing
- How to Burnish Leather Edges With Tokonole