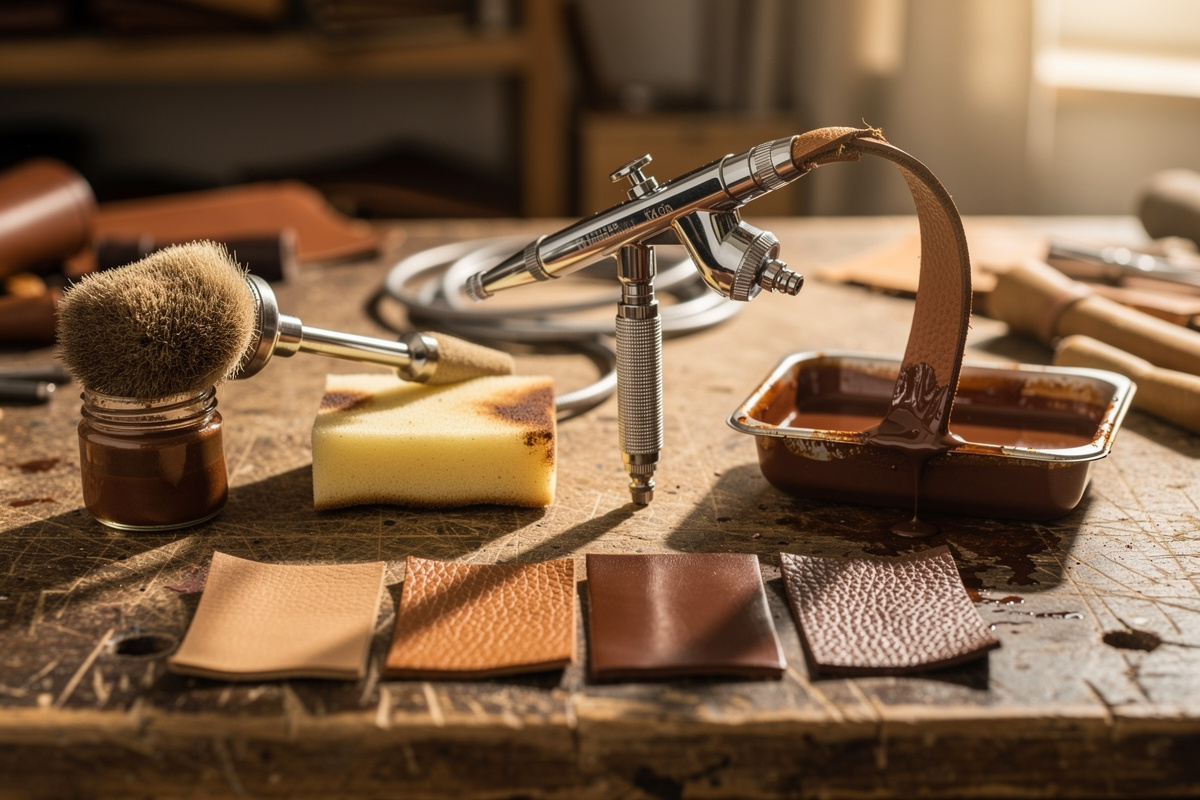
The four ways to apply leather dye are the dauber, the sponge, dip-dyeing, and the airbrush. Dip-dyeing gives the most even, saturated single color but burns through dye…
The four ways to apply leather dye are the dauber, the sponge, dip-dyeing, and the airbrush. Dip-dyeing gives the most even, saturated single color but burns through dye fast; an airbrush gives the most control and the cleanest fades but needs gear and a respirator; the sponge covers flat panels quickly; the dauber is the everyday tool for small and medium pieces. Match the method to the project size and the finish you want.
Most dye problems people blame on the dye are really application problems — the wrong tool for the size and shape of the piece. A dauber that gives a flawless wallet will streak a belt; a dip that gives a perfect belt is a waste of half a bottle on a card holder. I keep all four methods on the bench and switch between them by project, and this is how I decide. It sits under the complete leather dyeing guide, and pairs with the technique in how to dye leather without streaks.
The Dauber: Everyday Default
A wool dauber is the standard applicator for small and medium pieces — wallets, card holders, sheaths, straps under a couple of inches wide. It holds a controllable amount of dye, gets into corners and edges, and costs almost nothing. The weakness is even coverage on large flat areas, where the dauber’s small face leaves overlap lines that show as streaks.
The dauber is where everyone starts, and for good reason: it gives you direct control over how much dye lands where, which matters on a small piece with edges and details. Load it generously — a starved dauber drags and streaks — and work in long, confident, overlapping strokes, crossing the direction between coats so any line from the first pass is filled by the second. The trick that saves a dauber job is keeping a wet edge: never let one section dry before you blend the next into it, or you get a hard lap line. On anything bigger than about a hand-span of flat leather, though, the dauber starts working against you, because keeping a wet edge across a whole belt strap or bag panel is genuinely hard. That is the cue to switch tools.
The Sponge: Fast Cover on Flat Panels
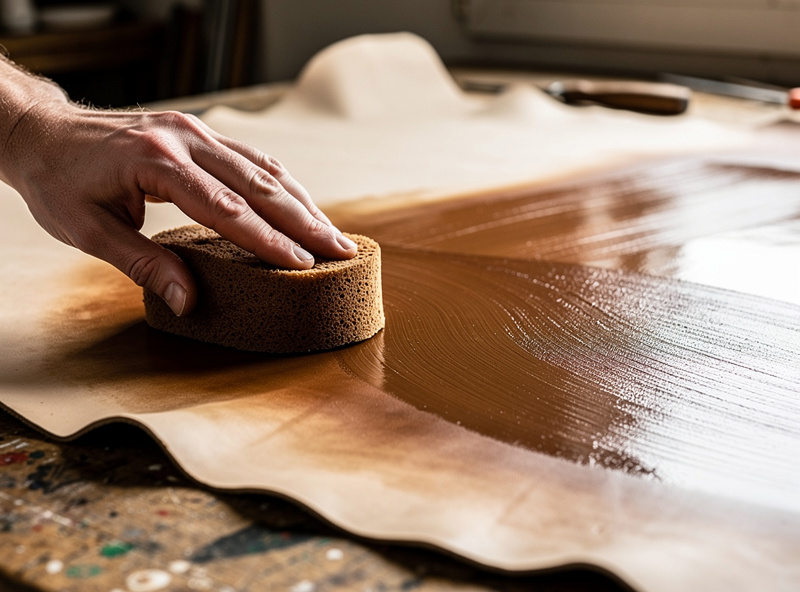
A sponge covers large flat panels faster and more evenly than a dauber because its bigger face lays down a wider, more uniform band of dye. It is the practical choice for bag panels, belt blanks, and notebook covers. The trade-offs are that sponge soaks up and wastes more dye, and the open cells can leave a faint texture if you dab instead of stroke.
For a flat panel, a sponge is often the sweet spot between the dauber’s control and the dip’s saturation. Use a dense, fine-pored sponge rather than a coarse household one, load it evenly, and pull long straight passes across the whole length of the piece, overlapping each pass into the wet edge of the last. Because the face is wide, you cover a panel in a few strokes before any of it can dry, which is exactly what kills the lap lines a dauber would leave. Cross your passes on the second coat the same way you would with a dauber. The honest downsides: sponges drink dye, so a big sponge job uses noticeably more than a careful dauber, and if you stipple or dab you transfer the sponge’s own texture into the finish. Stroke, do not dab, and a sponge gives a clean even field fast.
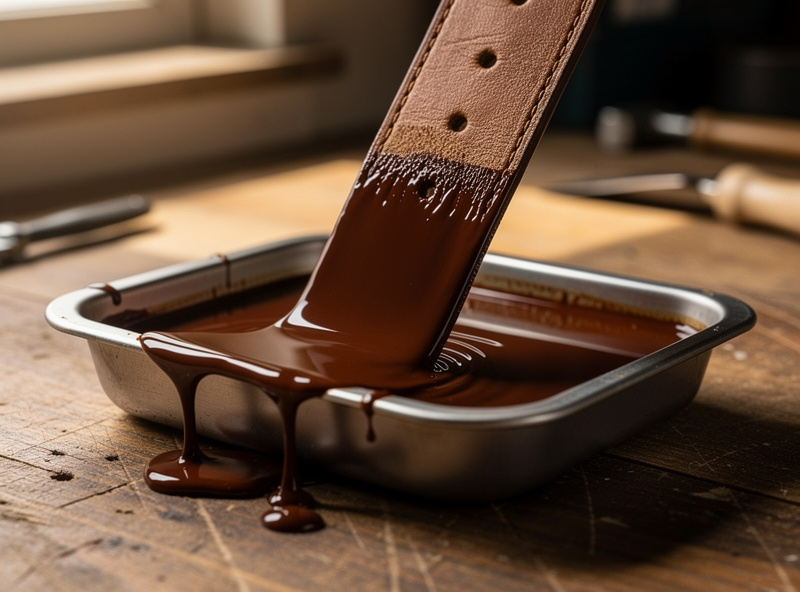
Dip-Dyeing: Maximum Even Saturation
Dip-dyeing means fully immersing the piece in a tray or container of dye for a few seconds, giving the most even, fully saturated single color possible with zero streaks because every surface is wetted at once. It is the gold standard for solid-color belts, straps, and small parts. The costs are real: it uses a lot of dye, gives little control over depth, and darkens the leather thoroughly.
When a piece has to be one flawless solid color edge to edge, nothing beats a dip. Because the whole surface goes under at the same instant, there is no wet edge to chase and no overlap to streak — the leather simply comes out uniformly dyed. The technique is quick and committed: submerge fully, count a few seconds (longer for darker), lift, let the excess drip back, and hang or lay flat to dry. Move decisively, because hesitation and partial dips leave tide lines. The catch is depth control — a dip drives color deep and dark, so a light or mid shade means a well-thinned dye bath and a short dunk, and even then the result is darker than the same dye daubed on. You also need enough dye to submerge the piece, which on a long belt is a serious pour, and most of it you cannot easily save. I dip belts, guitar straps, and batches of small hardware-sized parts; I do not dip anything where I want tonal variation or a precise mid-tone.
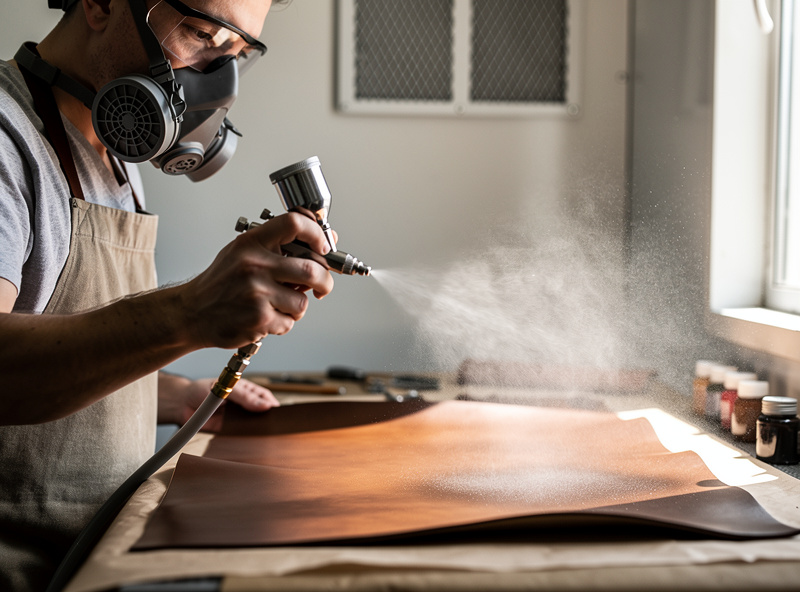
The Airbrush: Control and Clean Fades
An airbrush atomizes dye into a fine mist for the most even coverage, the best control over depth, and the only clean way to do gradients, fades, and shading. You build color in thin passes, so streaking is nearly impossible. The barriers are equipment cost, a learning curve, and the serious need for a respirator and ventilation, because atomized solvent dye is the most hazardous way to apply it.
The airbrush is the professional’s tool because it decouples color depth from a single nervous pass — you lay down many light coats, sneaking up on the exact shade, and you can fade one color into another or shade a tooled piece in a way no other method allows. Coverage is glass-smooth because the dye arrives as a uniform mist rather than a loaded applicator. That same atomization is the hazard: an airbrush turns solvent dye into a breathable aerosol, so this method demands a proper organic-vapor respirator (not a dust mask) and real ventilation or a spray booth, every time, no exceptions. There is also a learning curve — thinning the dye to spray correctly, setting air pressure, avoiding spitting and runs — and the gear costs more than every other method combined. But for fades, large even fields, and high-end finishes, it is worth it. Thin the dye well, keep the brush moving, and build the color in patient passes.
Leather Dye Application Methods Compared
Here is the whole decision in one place. Pick the row that matches your piece, not the one that matches the tool you already own.
| Method | Best for | Evenness | Dye used | Gear / skill | Main downside |
|---|---|---|---|---|---|
| Wool dauber | Wallets, small goods, edges | Good (small areas) | Low | Minimal | Streaks on big flats |
| Sponge | Bag panels, belt blanks | Very good | Moderate-high | Minimal | Wastes dye; texture if dabbed |
| Dip-dyeing | Solid-color belts, straps, parts | Excellent | High | Low skill, lots of dye | No depth control; goes dark |
| Airbrush | Fades, shading, large even fields | Excellent | Low (efficient) | High gear + skill | Cost, learning curve, fumes |
Safety: The Airbrush Changes the Rules
All solvent dye wants ventilation and gloves, but the airbrush raises the stakes because it makes the dye breathable. For brushing, daubing, sponging, and dipping, open a window, run a fan, and wear nitrile gloves. For airbrushing, that is not enough — wear a proper organic-vapor respirator and work in a spray booth or strong cross-ventilation, because you are now putting atomized solvent into the air you breathe. Dip-dyeing also means an open tray of dye, so keep it away from anything that could knock it over. None of this is alarmist; matching the protection to the method is just part of doing the job right.
Disclosure: LeatherCraftHaven is reader-supported. As an Amazon Associate I earn from qualifying purchases made through links in this article, at no extra cost to you. I only point to gear I actually use or would buy for my own bench.
Building Out the Methods
You do not need every method at once — add them as your projects grow. Start cheap with daubers and a sponge, add a dip tray when you start making belts, and invest in an airbrush only when you want fades and volume.
Begin with a bag of wool daubers and some dense fine-pore sponges — together they cover most projects for a few dollars. When you graduate to fades and big even fields, an airbrush and compressor kit is the upgrade, and it is non-negotiable to pair it with a organic-vapor respirator. Whichever method you pick, the dye itself matters — the best leather dye for veg-tan roundup ranks the bottles, and the dye types comparison covers which carrier sprays, dips, and daubs best.
Frequently Asked Questions
What is the best way to apply leather dye?
It depends on the piece. Use a wool dauber for wallets and small goods, a sponge for flat panels, dip-dyeing for a flawless solid color on belts and straps, and an airbrush for fades, shading, and large even fields. Match the method to project size and the finish you want.
Is dip-dyeing leather better than using a dauber?
For a single flawless solid color, yes, because immersion wets every surface at once and leaves no streaks. But dip-dyeing uses a lot of dye, drives color deep and dark, and gives little depth control. A dauber is better for small pieces, edges, and any tonal control.
Do you need an airbrush to dye leather?
No. A dauber and sponge handle the great majority of projects. An airbrush is only necessary for fades, shading, and high-end even fields, and it requires a compressor, a learning curve, and a proper respirator. Most makers never need one for solid-color work.
How do you dye leather evenly without streaks?
Match the method to the size. Keep a wet edge and cross your strokes with a dauber or sponge, dip-dye for a guaranteed even solid color, or build thin coats with an airbrush. Deglaze first and work in long overlapping passes rather than dabs.
How much dye does dip-dyeing use?
A lot, because you need enough to fully submerge the piece. A long belt can take a serious pour, and most of the bath is hard to save afterward. That dye cost is the trade-off for the perfectly even, fully saturated color that dipping gives.
Do you need a respirator to airbrush leather dye?
Yes, always. Airbrushing atomizes solvent dye into a breathable mist, so a proper organic-vapor respirator and real ventilation or a spray booth are mandatory. A dust mask does not protect against solvent vapor. This is the most hazardous way to apply dye and the one that demands the most protection.
Can you sponge leather dye on large pieces?
Yes, a sponge is one of the best tools for large flat panels because its wide face lays down an even band and covers the piece before it can dry. Use a dense fine-pored sponge, stroke rather than dab to avoid texture, and accept that it uses more dye than a dauber.
Related Articles
- Leather Dyeing: The Complete Veg-Tan Guide
- How to Dye Leather Without Streaks or Blotches
- Leather Dye Types: Oil vs Water vs Acrylic
- How to Antique Leather: Aged Finish, Resist Control
- Best Leather Dye for Veg-Tan: 8 Brands Tested